
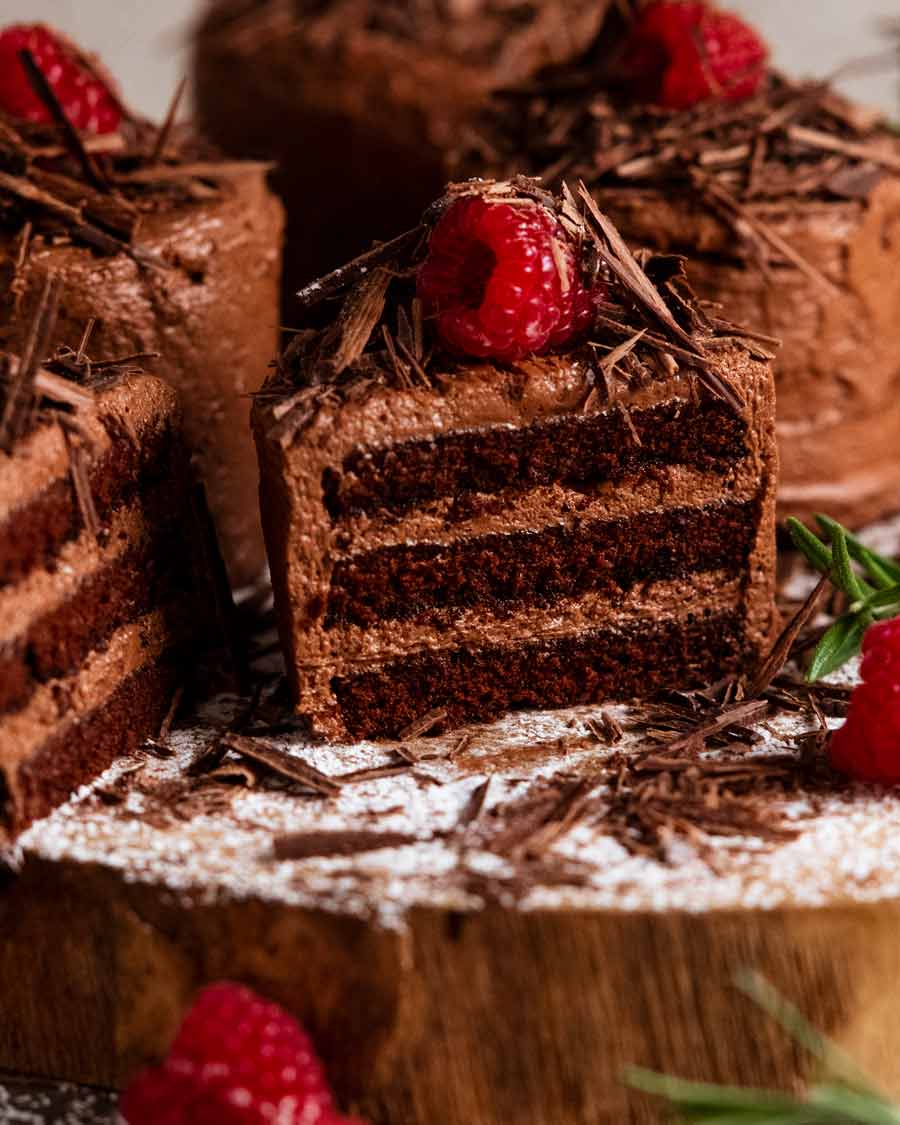
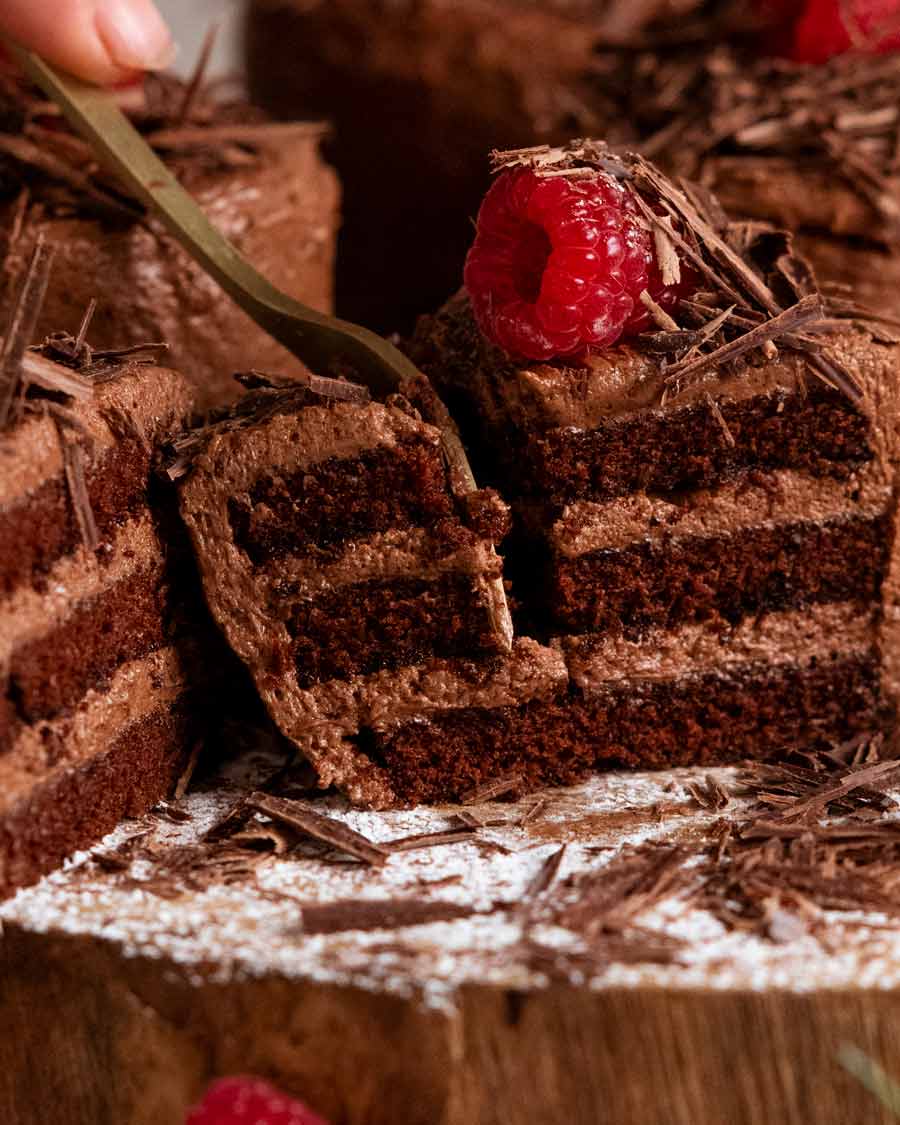
We make mini chocolate cakes because they’re adorable, there’s an excellent ratio of frosting to cake, and you get the whole thing to yourself! With 3 layers of chocolate cake smothered in fluffy chocolate buttercream frosting, these are the perfect special occasion dessert.

Mini Chocolate Cakes
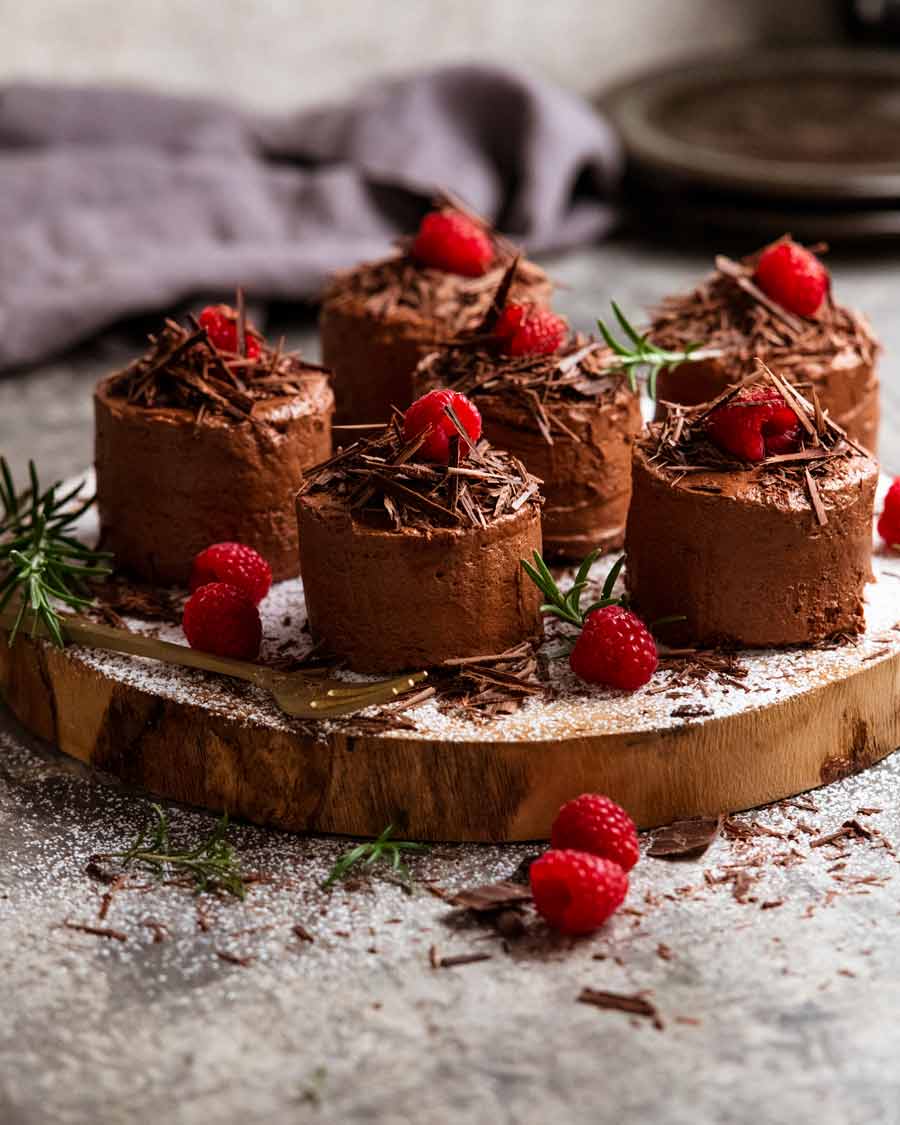
These adorable mini chocolate cakes are a petite 7cm/2.75cm size that’s made for not sharing with family and friends. Right in the spirit of special occasions that I’m suggesting you make these for! 😂
So, let me speak frankly. Individual portion mini cakes do take more time to decorate than a single chocolate cake. But they are more special. They look so great lined up on a platter. You don’t have to deal with the mess of cutting a giant cake.
And there is a high ratio of frosting to cake. These mini cakes call for half a batch of chocolate cake but a FULL batch of frosting! Not just because I’m being greedy, but simply because mini cakes have more surface area to cover.
So, for your next special occasion, there’s no need to spend $12 for a single mini cake from that posh patisserie down the road, only to be disappointed with how dry the sponge is and how meh the frosting is because it’s not made with real butter for cost cutting reasons. Let’s make our own!
(PS This recipe makes 7 mini cakes which is $84 worth for around $13 of ingredients).
Ingredients in Mini Chocolate Cakes
We’re using my classic chocolate cake batter here. It’s the perfect cake to use for mini cakes because it’s moist and stays moist (small cakes dry out faster than large ones) with the bonus that it’s a really quick and easy batter.
Chocolate cake layers
Here’s what you need for the chocolate cake batter:
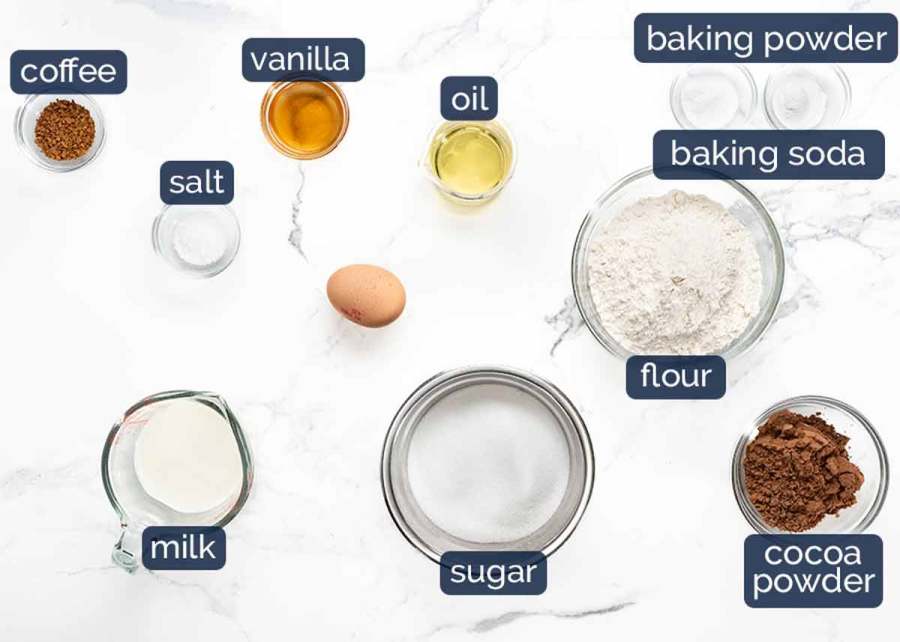
Flour – Just plain / all-purpose flour. The cake won’t be as soft using self-raising flour.
Sugar – Either superfine / caster sugar or ordinary white sugar (granulated sugar). They work the same.
Baking powder and baking soda (bi-carb) – This cake specifically uses both because it makes the softest cake with an even rise (rather than a dome). However, if you’ve only got baking powder, you can substitute the baking soda with an extra 2 teaspoons of baking powder.
Cocoa powder – Just ordinary unsweetened cocoa powder. Not dutch processed, not hot chocolate sweetened cocoa!
Milk – Full fat cow milk is best, though low fat works too.
Large egg – A 55-60g/2oz egg from a carton labelled “large eggs”. More on eggs for baking here.
Oil is the fat in this cake which is what keeps this cake incredibly moist for days upon days. The sponge is drier if you use butter. Any natural flavoured oil can be used.
Coffee powder – Enhances the chocolate flavour, but you can’t taste coffee! Feel free to skip it.
Vanilla – For extra flavour!
chocolate buttercream frosting
And here’s what you need for the chocolate buttercream frosting.
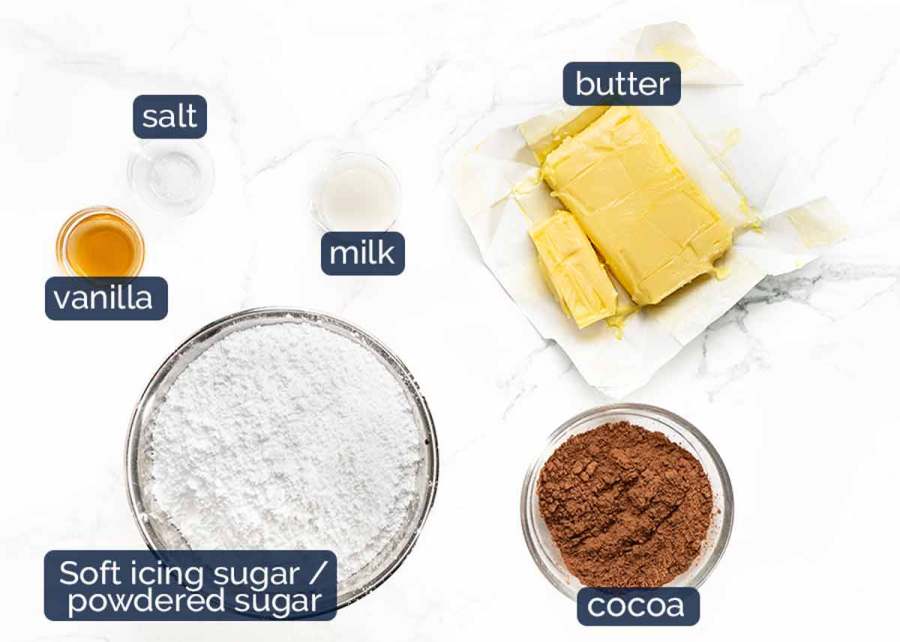
Unsalted butter – Softened to room temperature so it can be whipped into a fluffy frosting. Don’t let it get too soft and sloppy else your frosting will be too! Technically in baking terms, “softened butter” should be 17°C/63°F – firmer than you think! 🙂 This is soft enough to whip into creamy fluffiness but firm enough so it doesn’t turn frosting into slop.
Soft icing sugar / powdered sugar – As noted above, be sure to get soft icing sugar! If you use pure icing sugar the frosting will not be soft and fluffy, it sets hard.
Cocoa – As with the cake, use plain unsweetened cocoa. Not dutch processed or sweetened.
Vanilla – For flavour.
Pinch of salt – To bring out the flavours in the frosting.
How to make Mini Chocolate Cakes
It really is just your favourite chocolate layer cake in mini form. But I have some little tips to make your mini-baking-life a little easier because it can get a little fiddly!
1. The cake part (super easy!)
This is my classic chocolate cake batter with minor alterations to make a smaller batch baked in a thin layer that we cut rounds out of.

Whisk dry – Sift the flour, cocoa, baking powder and baking soda into a bowl. Add the sugar and salt, then whisk to combine.
Add wet – Add the egg, oil, milk and vanilla first, then whisk. Stir the coffee powder (if using) into the hot water then whisk that into the batter. It will be VERY thin!
Baking tray – Pour into a lined baking tray. I use a 40 x 28.5 x 2.5cm cm tray (15.8 x 11.3 x 1″ – US standard jelly roll pan). This makes a cake which is about 12mm / 1/2″ thick which is ideal for a 3 layer mini cake. Any tray around this size will work though smaller pans will make thicker sponges and larger ones will make thinner ones.
Bake for 13 minutes at 180°C/350°C (160°C fan-forced).
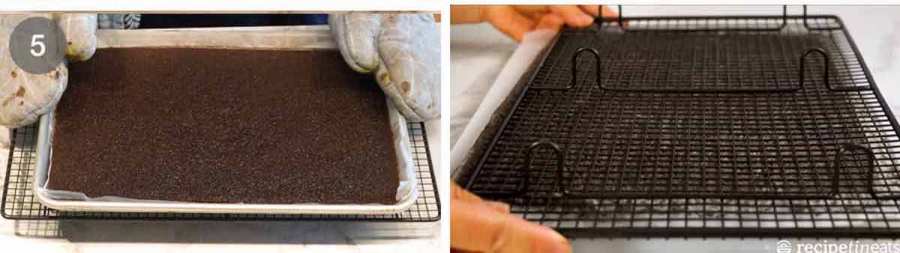
Cool in the pan for 10 minutes then use the paper to lift it out onto a cooling rack. Leave to cool on the paper for at least 30 minutes, then refrigerate for another 1 to 4 hours (uncovered) to fully, fully cool. ⚠️ Cooling properly is an important step because otherwise the cake may be too fresh and crumbly to cut out neat circles.
Invert – ⚠️ Another important step – flip the cake upside down before cutting circles! Cover the surface of the cake with baking paper (it is quite sticky, so using paper is important). Then flip it upside down onto a cutting board so the sticky surface of the cake is facedown.
Why does this matter? Because if the sticky surface is facing up, it is difficult to cut out neat circles as the sticky surface gets stuck on the ring then drags down the cake as you press down.
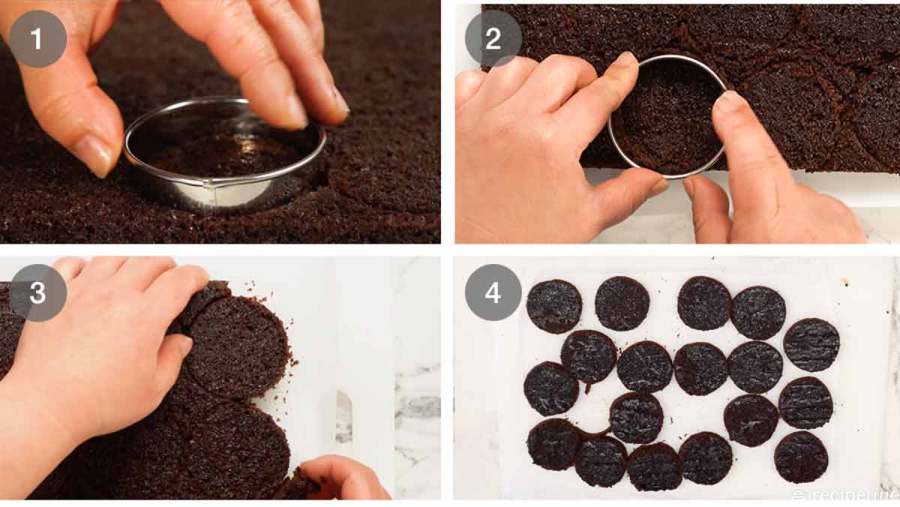
2. Cutting rounds
Use a 6cm / 2.4″ round cutter to cut circles out of the cake. Cut the circles as close to each other as you can to minimise wastage. You should have 21 circles. Feel free to use a different size cutter to make more smaller ones, or less larger ones!
See below for option to not cut rounds.
Prefer not to cut rounds? Or don’t have a cutter? No problems! Make square or rectangle cakes. Cut the cake into 3 equal size rectangles. Frost and stack. Refrigerate to set the frosting (so it doesn’t smear when you cut). Then cut into squares / rectangles, and frost the sides.
3. Chocolate buttercream
This is your standard buttercream, so the only things to watch out for is to start the beater on low once you add the icing sugar (to avoid a snow storm!) and to beat, beat, beat for a good few minutes at the end to get the frosting nice and fluffy!
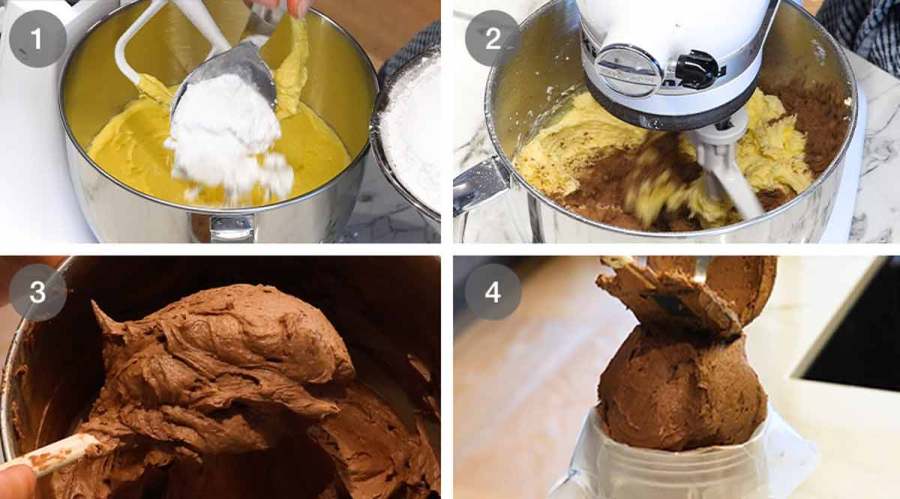
Cream butter & icing sugar – Beat the butter first until nice and fluffy (a good 3 minutes), then gradually add the icing sugar and beat it in.
Fluff it! Beat in the cocoa powder, milk and vanilla, then once it’s all incorporated, beat on high for a full 3 minutes. This creates volume and makes the frosting fluffy so don’t skip it!
Proof of fluffiness. Try not to eat too much!
Piping bags – Transfer the frosting to a piping bag to apply to the cakes. This is the fastest and easiest way to frost the cakes! Without, you will be tearing your hair out and cursing me. Here’s why:
Trust me – piping bag is best!
The fastest and easiest way to frost these mini cakes is to use a piping bag. This avoids the need for a two step “crumb coating” that we’d otherwise need to avoid crumbs smearing into the frosting as we spread it across the cake.
This is my standard way of frosting cakes these days, mini and full size!
The crumb smearing frustration – The chocolate cake is soft and delicate because it’s a moist, springy cake (rather than dry and stiff!). What this means is that in mini form, and especially once you’ve cut rounds, the cake is very susceptible to crumbs smearing into the frosting as you spread it across the surface, which makes it look untidy.
Getting around the crumb smear – One way to get around this is to do what is called a crumb coat whereby a thin layer of frosting is spread all over the cake to catch and “glue down” the crumbs, and create a smooth surface for the final layer. The cake is then refrigerated to set the frosting, then the final layer of frosting is applied.
The piping bag solution! However, we can bypass that fiddly two step process simply by using a piping bag. By piping the frosting on, we essentially avoid contact with the surface of the crumbs on the cake layers when spreading!
So, trust me on this. A piping bag is the way to go! You can even just use a freezer bag because this frosting is so smooth. Just something to pipe it on. You don’t need a piping tip. 🙂
4. frosting
OK, now that you’re fully on board the frosting piping train (which, by the way, is my standard way of applying frosting to cakes these days, mini or not), let me show you how easy it is to do for these mini cakes!
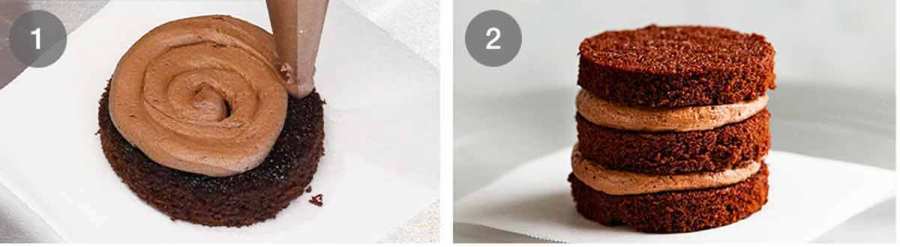
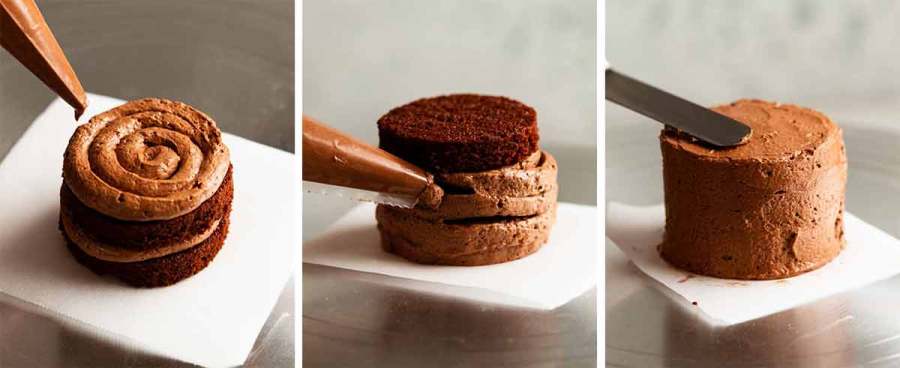
First layer – Place a layer on a small piece of paper on a cake turntable if you’ve got one (or lazy Susan). But it’s fine if you don’t, it’s easy to use this method on small cakes even without one. Then a snail on the first layer. No spreading needed.
Layer – Place the 2nd cake layer on top, pipe another snail then cover with the 3rd layer.
Surface – Pipe a snail on the top which will be the surface.
Sides – Then pipe the frosting around the side of the cake, starting at the bottom. No need to be meticulous here because we will spread it.
Spreading – Now, to spread the frosting, use a light touch and spread just the surface. Avoid making contact with the cake which will dislodge crumbs that smear into your frosting! No need to be meticulous with the frosting if you plan to cover the surface. And the sides are nice when they are left a little rustic!
Voilà! Crumb-free frosting mini chocolate cakes, ready for decorating!
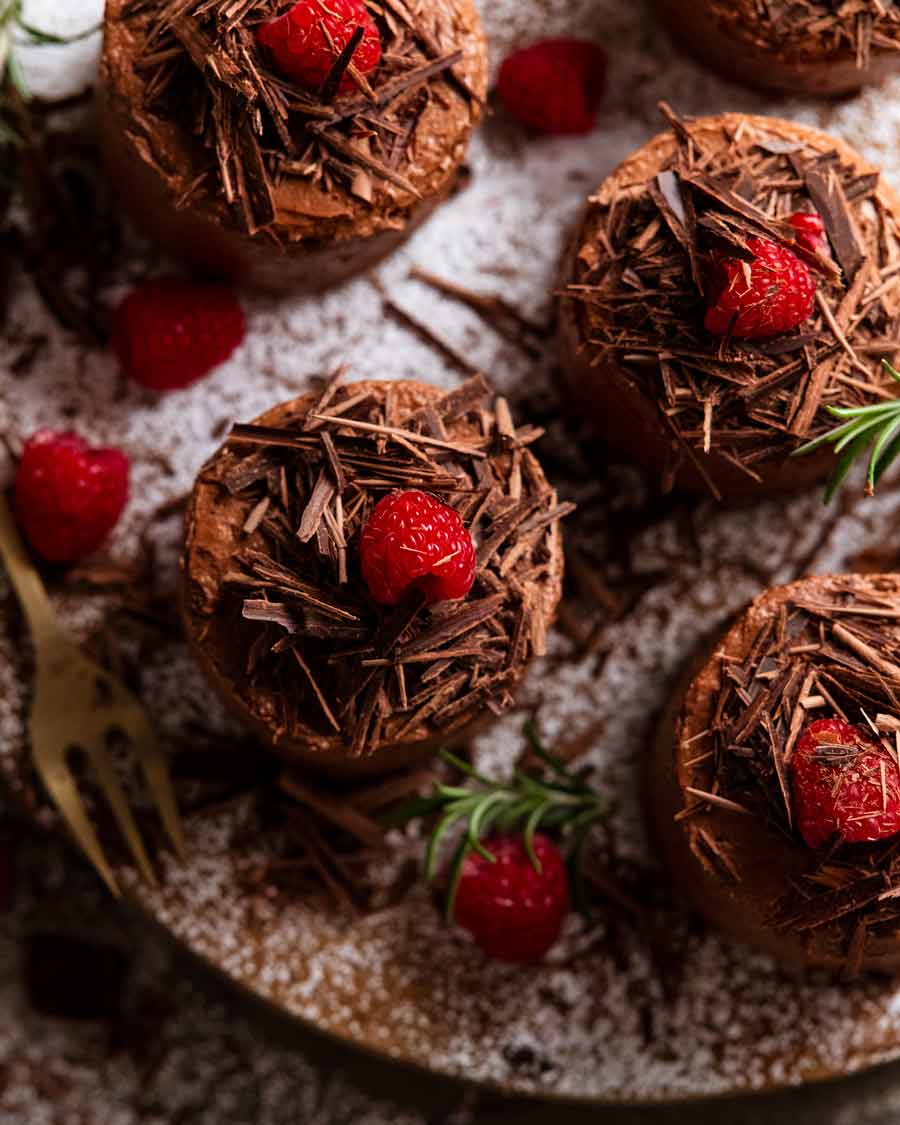
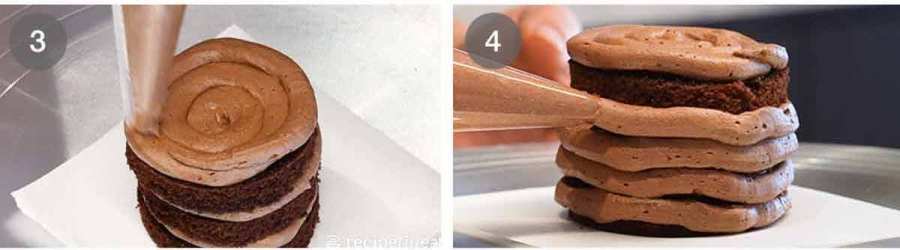
5. CHOCOLATE SHAVINGS FOR DECORATING
Decorate as you please! The easiest would be a dusting of cocoa or icing sugar / powdered sugar, or colourful sprinkles for cheerful mini birthday cakes. Pictured in post are chocolate shavings. Here’s how to do them:
Chocolate blocks – Use chocolate of choice. In the video I use mainly dark chocolate with a bit of white for colour.
Shave – Stand the chocolate on a 45 degree angle then use a knife to shave shards.
Said shards!
White chocolate is softer than dark chocolate so you will get nice curls. Whereas dark chocolate is harder so is more flaky.
Pile onto the cakes. Avoid touching the chocolate because it will break / melt easily. A fork makes transference and pilling easy.
Decorated and ready to impress!
I know, you’re already visualising the look on everybody’s face when you walk into the room with a platter of these mini cakes.
Surprise. Delight.
And of course, so, so impressed. So if the eat part isn’t enough to spur you on to make these, do it for the praise! People will be talking about your mini cakes for days to come. Weeks! Month! (I really need to grow up. Who encourages people to bake things just for the praise? 😂) – Nagi x
Watch how to make it
Hungry for more? Subscribe to my newsletter and follow along on Facebook, Pinterest and Instagram for all of the latest updates.
Mini chocolate cakes
Ingredients
- 1 cup plain flour / all-purpose flour
- 1/3 cup cocoa , sifted (unsweetened, not dutch processed – Note 1)
- 3/4 tsp baking powder
- 3/4 tsp baking soda / bi-carb (Note 2)
- 1 cup white sugar
- 1/2 tsp cooking salt / kosher salt
- 1 large egg , at room temperature
- 1/2 cup milk , preferably full fat, at room temperature
- 1/4 cup plain oil , like vegetable, canola, peanut oil
- 1 tsp vanilla extract
- 1/2 cup boiling water
- 1 tsp instant coffee powder , option (Note 3)
Chocolate Buttercream
- 250g / 1 cup unsalted butter , softened
- 4 cups soft icing sugar / powdered sugar , sifted
- 1/2 cup cocoa powder , unsweetened
- 1 tsp vanilla extract
- 5 tbsp milk , preferably full fat
Decorations
- Dark chocolate , finely shaved using a knife (white chocolate is also pretty)
- Raspberries, rosemary sprigs
Instructions
- Preheat oven to 180°C / 350°F (160°C fan-forced).
- Baking pan – Butter a 40 x 28.5 x 2.5cm cm tray (15.8 x 11.3 x 1" – US standard jelly roll pan) then line with baking paper (parchment paper).
Cake layers
- Whisk dry – Sift the flour, cocoa, baking powder and baking soda into a bowl. Add the sugar and salt, then whisk to combine.
- Mix in wet – Add the egg, milk, oil and vanilla. Whisk to combine. Dissolve the coffee in the hot water, then add into the batter. Whisk to combine. The batter will be VERY thin!
- Bake – Pour into the pan and bake for 13 minutes.
- Cool for 10 minutes then use the paper overhang to lift the cake onto a rack and cool for 30 minutes (leave it on the paper). Then refrigerate uncovered for at least 1 hour before cutting rounds (cake is too soft when freshly baked).
Assembling & frosting:
- Cutting rounds – Cover the sticky surface with paper. Then flip upside down onto a cutting board (ie sticky side down). (Note 4) Peel the paper off the base. Then press out 21 x 6cm / 2.4" rounds (or other size or shape as you desire).
- Pipe frosting – Place a piece of cake on a small piece of paper, using a dab of frosting to stop it from sliding. Pipe coils of frosting on the layers, using 3 rounds for each cake. Pipe frosting around the sides and on the top. (A cake turntable is handy if you've got one but not essential.)
- Smooth frosting – Smooth the frosting using a small offset spatula or knife, taking care to only touch the surface. Avoid touching the cake because it will dislodge crumbs that will end up in your frosting!
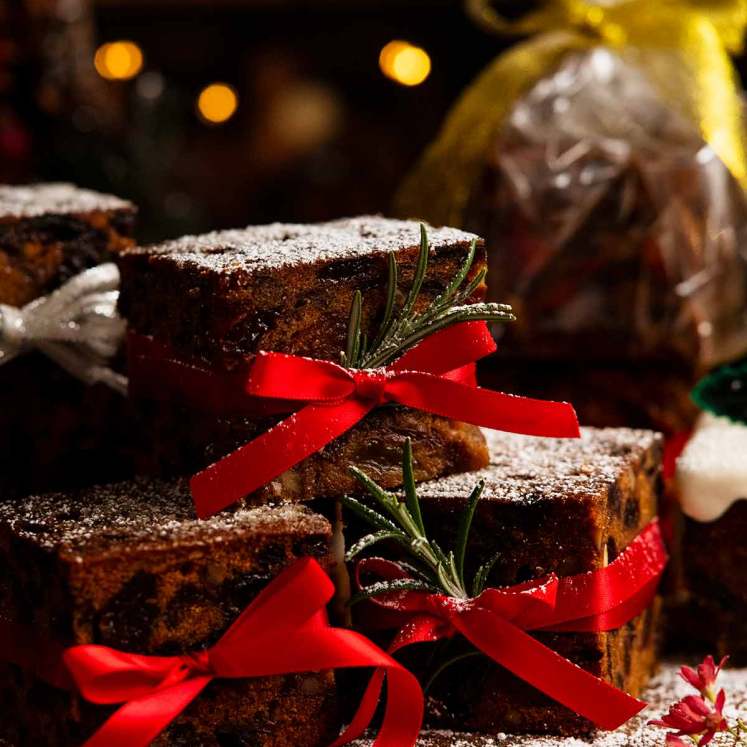
- Decorate with piles of chocolate shards. I also used raspberries and rosemary for the photos in the post!
Chocolate buttercream:
- Beat butter for 3 minutes on high until soft and fluffy. Add icing sugar in 3 lots. Beat it in, starting on low speed then increasing the speed (to avoid a snow storm). Once incorporated, add more icing sugar and repeat.
- Beat 3 minutes – Once the icing sugar has all been added, added the cocoa powder, milk and vanilla. Beat again, starting on low speed then increasing the speed gradually. Once the cocoa is incorporated, beat on high for 3 minutes to make it really nice and fluffy.
- Piping bags – Transfer to a piping bag for frosting. (This is the fastest and easiest way, trust me on this. Even a ziplock bag will work here).
Recipe Notes:
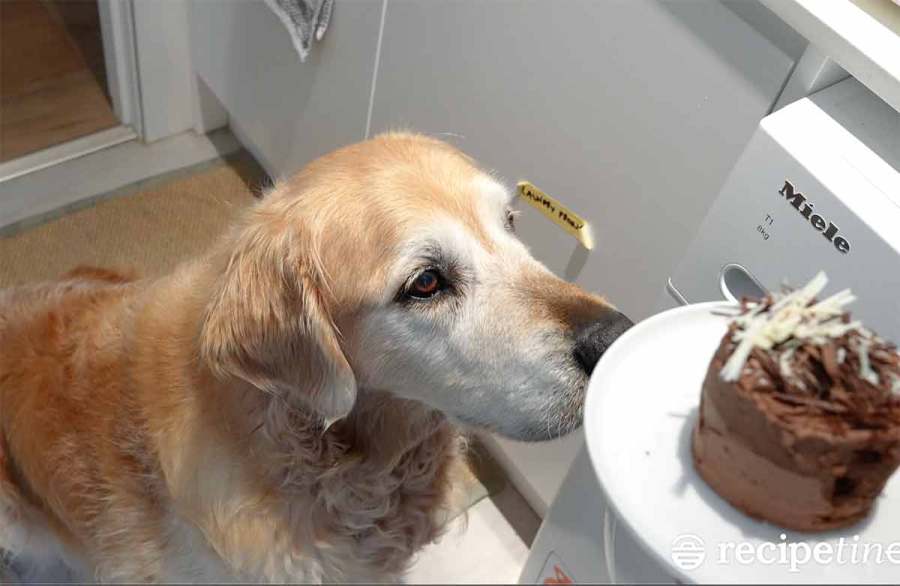
Life of Dozer
In today’s recipe video, you get to watch Dozer following me around the house while I eat the chocolate cake then eventually trapping me in a dead end (laundry). No chocolate cake for Dozer!!
These were so easy to make and so easy to eat 🙂 Poor Dozer you tease him so much hahaha
These little cakes were fun to make and SO SO DELICIOUS! My icing technique still needs work but the perfection was in the taste!
I haven’t made this yet, but why did you use an American jelly roll pan? Australian baking trays are smaller, and I expect I would struggle to squeeze a jelly roll pan into my oven. Paying through the nose to have one shipped here seems to defeat the object of the exercise. 🙁
THESE ARE PERFECTION!!! My only question is HOW IN THE WORLD DO YOU MAINTAIN YOUR PHYSIQUE??? Your recipes are incredibly delicious and the most simple to make I know I cannot eat just a little bit i want to gobble everything down in a sitting lol…sending hugs and smooches to King Dozer
I made these and used the chocolate less sweet frosting. I was worried that the frosting might not be “strong” enough to support the 2 top layers so I put a smidge of jam on the bottom round. I don’t have a turntable, but I used an upturned coffee mug so I could rotate the cake. They were yummy.
The buttercream was delicious and so was the cake. I could not get the buttercream to stick on the cake. What was I doing wrong?
If we skip the coffee, do we still need to add the water? Thank you for any help 😊
Yes! Hot water. 🙂 N x
These look fabulous, but just to let you know your link to your cookbook for the stuffed butternut is coming up with pan seared salmon.
OH NOOOOO!!! 😭 It was such a perfect one for Thanksgiving, I’m so bummed readers will miss it! 😭😭😭
THIS IS PERFECT FOR DESERT SERVING I AM SERVING FOR MY PARTY COMING WEEKEND – THANKS NAGI JUST IN TIME
I hope you love it Tazz!! N xx
Rum balls with the cake scraps! Very Christmassy! Yum…
Yes! I forgot to mention what to do with the scraps! N xx
how do you make rum balls with cake scraps – sounds interesting
You crumble the cake to make crumbs and mix with rum and some other stuff, including condensed milk and roll in chocolate sprinkles. I think I got my recipe from the back of the choc sprinkle packet years ago. I am sure Mr. Google can help!
https://www.taste.com.au/recipes/chocolate-rum-balls/120c4d59-ca76-4c37-a707-97d4e08456a4
Pretty sure this is the one.
thanks so much will have to give this a try
These look so good and will make nice cute gifts.
These look great. I like the idea of squares because I would eat the scraps. I think I will make it without icing the sides. It looks good in the pictures and I think it is a lot of icing with the sides being iced
Hi Suzy! It will work terrific as squares, just a little tip – if you are not icing the sides then just be extra careful to cut the squares the same height so they look neat! OR cut 3 rectangles, sandwich them together with frosting, then cut into squares 🙂 N x
thank you for the suggestions
I really like these suggestions Suzy. I’ll now be giving this recipe a go based on these, many thanks for sharing!
Nagi, you are the best. Love the way you teach us little tips and tricks. As well as being YUMMY, I always learn something from your recipes. Thanks!
PS Gotta love Dozer’s perserverance!!!
So glad you found the tips useful Edie! N xx
These look delicious (and nobody need know about the chef’s treat with the leftover bits from the circle cutting!). Now I just need to plan a get-together to give me an excuse to make them!
Nagi, this looks wonderful! I have been on a mission for 2023 to make my family their favorite cakes from scratch for their birthdays. This one will go for Dec. birthday. However, I am tasked with making an Italian Cream Cake for Nov (which I have never made before) and love the idea of trying a sample with the mini. Do you know if there is anything I should do/avoid when converting another recipe to minis?
Hi Mary! The main thing is making the cake into thin enough layers to make them mini. This one was actually irritatingly difficult to make into a thin slab that was even, not too thick, not too thin and not too “tacky” so we could cut rounds out easily! N x
Looks divine… Vanilla cake version of this please?
Hi Tania! I haven’t tried it yet because my vanilla cake batter is more sensitive than the chocolate one so I took the say path and started with the chocolate one! 😂 Vanilla will be next. Maybe for Easter? 🙂 N x
Why would SR Flour make the cake dry please?
Make cute gifts! :))
Hi Mary! It won’t make it dry, it’s just that SR flour doesn’t rise as well as using flour + baking powder (and/or baking soda). So the cake isn’t as soft. It’s just the way it is! The main reason is that baking powder starts to lose rising power once the seal of the tub is broken. So if you buy it pre-mixed into self raising flour, the baking powder is already “old”, if you know what I mean. 🙂 N x
Yum… looks so good! I immediately wondered though if you could frost the whole cake, Freeze it, then cut out the rounds. Only need to assemble and frost the sides. Scraps could be smooshed up for cake pops or truffles.. maybe dipped in chocolate? Thanks Nagi for your amazing ideas and recipes.
Hi Kimmy! Funny you mention freezing because I did just that! The frosting got too dense, sadly. Believe me, I applied much thought into the easiest way to do this! Piping bag really is the easiest. 🙂 N x
Hi, Cake looks delicious 😋
I would like to make it for a birthday cake so would prefer to make one 2 tier cake. What size round springform tin should I use. Thanks x
Hi Chris! Just use the original chocolate cake recipe on which this is based, it is a 2 layer cake! N x https://www.recipetineats.com/chocolate-cake/
Nagi has several chocolate cake recipes included on her Recipe Tin Eats website, including the one that this is based on. I’m sure you’ll find the right size for what you’re looking to make.
Thanks Lorraine I have a look on the website 🙏
You’re welcome Chris, hope you find what you’re looking for and it tastes as great as all of Nagi’s cakes do!
These look and sound amazing. Could I use gluten free flour. Love all your recipes and Dozer updates 🤗