
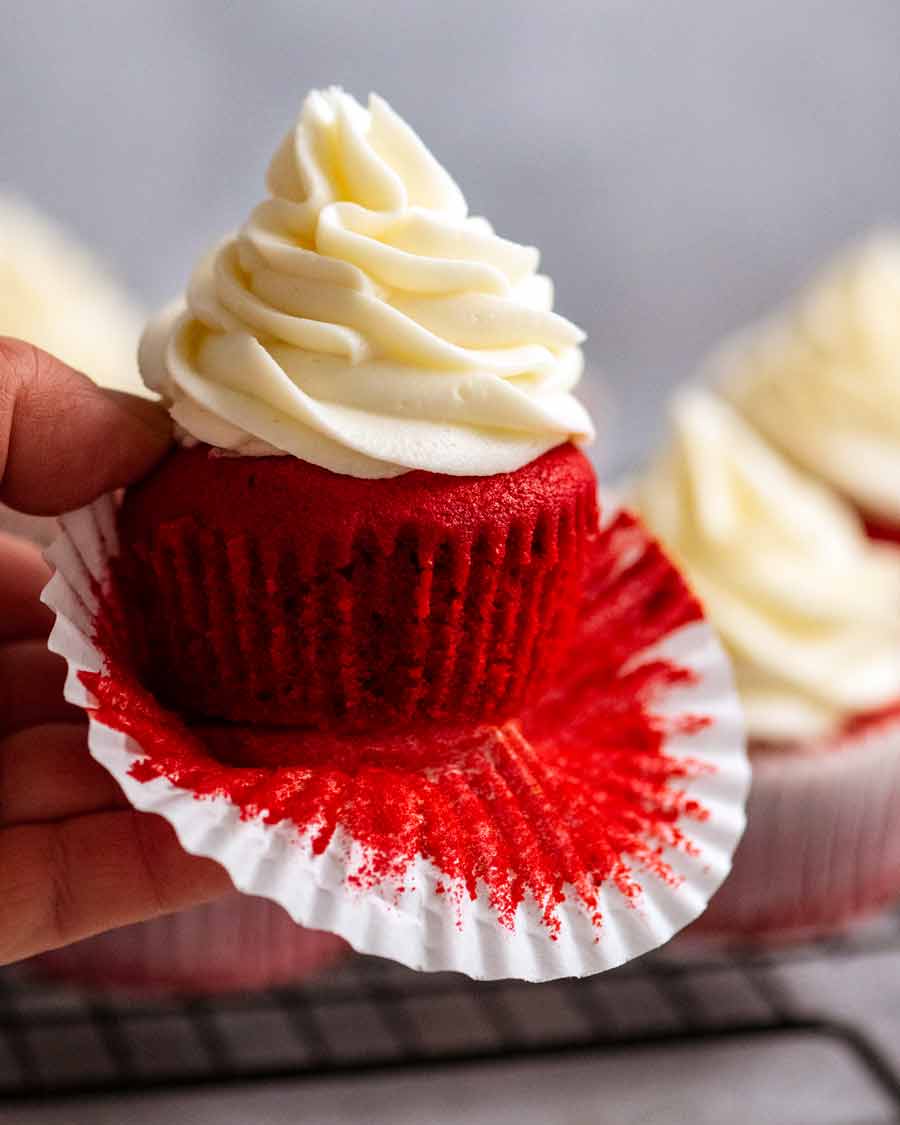
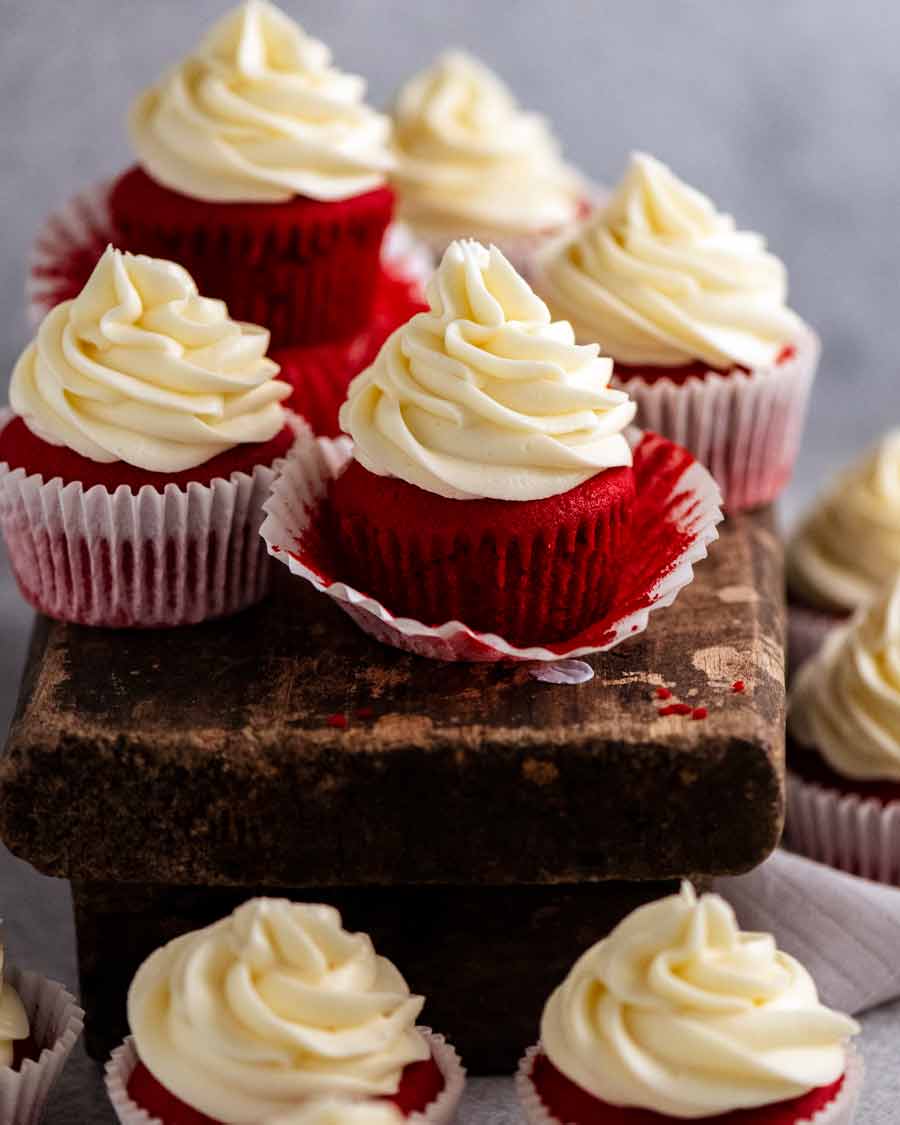
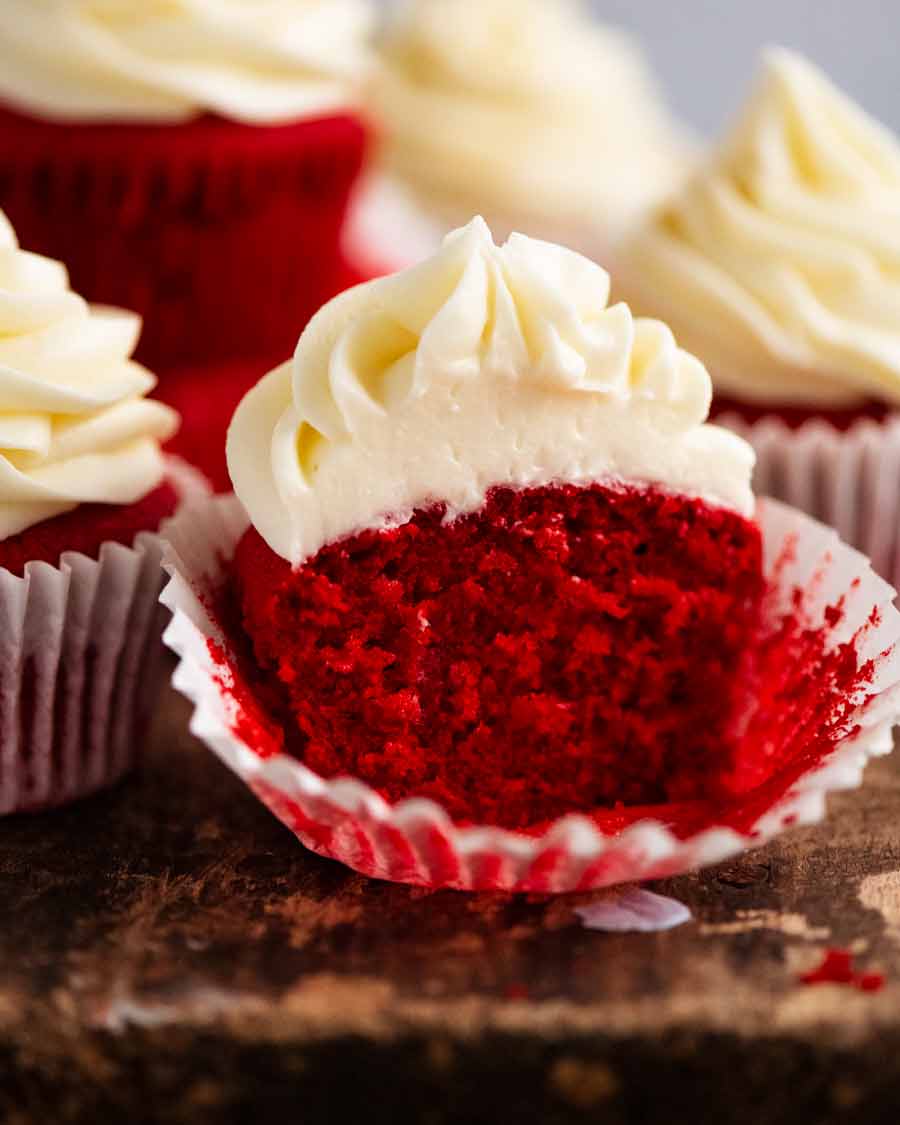
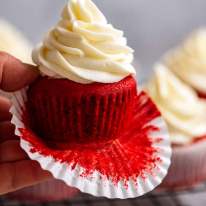
Ever wondered how Red Velvet Cupcakes got their name? It’s the crumb, for one. True to its name, this cupcake version of Red Velvet Cake is a striking scarlet colour that’s velvety and soft, with a hint of vanilla and chocolate flavour. Topped with fluffy cream cheese frosting, it loves to steal the lime light. And we happily let it!
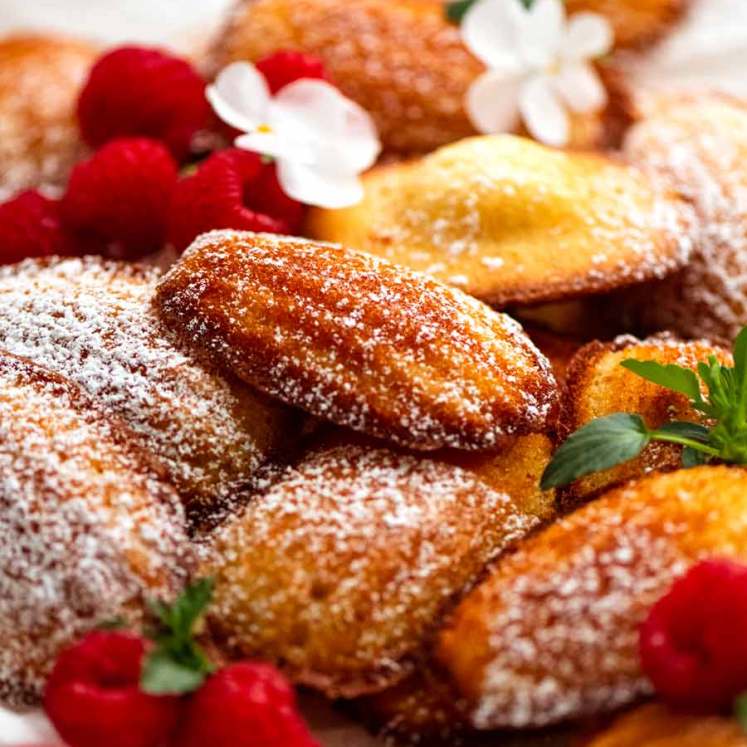
Red Velvet Cupcakes
The eye-catching cupcake version of the iconic Red Velvet Cake taste like a cross between vanilla and chocolate cupcakes, and are piled high with swirls of fluffy cream cheese frosting. With a superior, buttery and “velvety” sponge, Red Velvet Cupcakes are THE treat to make when you want to be the talk of a gathering.
It commands attention – both visually, and by virtue of pure deliciousness. And just think: No matter how crowded the pot luck buffet table is, everybody’s eyes will immediately be drawn to YOUR cupcakes. Because how can one miss these? (Answer: You can’t!)
Ingredients in Red Velvet Cupcakes
Here’s what you need for the Red Velvet Cupcakes. You might be wondering – vinegar? Why oil AND butter? And is cake flour really necessary? Read on to find out the answers!
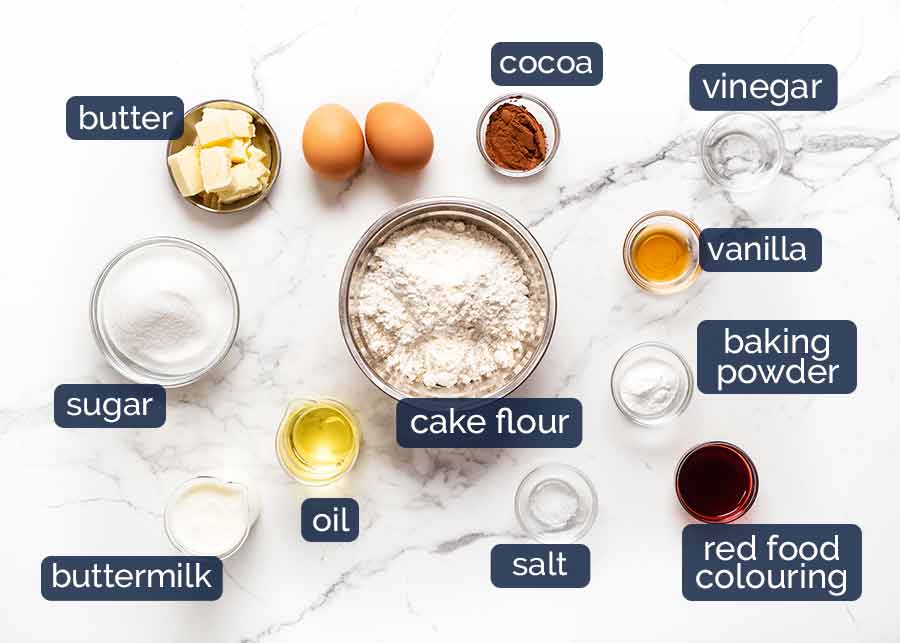
Cake flour – This low protein flour is specifically to make the crumb of cakes more tender. For Red Velvet Cupcakes, it also makes the dome more nicely rounded compared to using plain flour (all purpose flour).
If you use plain / all purpose flour, the cupcake is still excellent, however, you will notice that the dome has a bit more of a peak to it. Not drastic or offensive, and it’s hidden under the frosting anyway!
My advice? Worth hunting down cake flour if you’re making this for a special occasion / wanting to show off. Otherwise, don’t make a special trip to the store.
Buttermilk – Fermented milk that is thicker than plain milk but thinner than cream, with a slight tang. An ingredient used in baking for flavour (the subtle background tang is a signature characteristic of Red Velvet Cupcakes), and to make cakes lighter because the acid in it helps tenderise gluten.
It is also commonly used in baking to make cakes lighter because the acid in buttermilk activates baking soda to make cakes rise. However, this doesn’t apply to Red Velvet Cupcakes because we’re using baking powder instead which already has acid in it to activate the rising power.
Don’t have buttermilk? Make it yourself. It just requires lemon juice or vinegar and milk! Directions in recipe notes.
Baking powder – To make the cupcakes rise! Note: I use baking soda for Red Velvet Cake. But for cupcakes, I prefer baking powder because it gives the cupcakes a prettier dome (baking soda gives it a slightly unsightly peak).
Vinegar – This is sometimes used in baking recipes that use baking soda as the leavening agent to make them rise, such as in my Red Velvet Cake recipe, because the vinegar gives the baking soda a kick start in the rising process.
However, it also plays a part in the tenderness of the crumb because acid helps breakdown gluten (as noted above in buttermilk). And interestingly, I found that using vinegar helps preserve the vibrant red colour in the cupcakes.
So even though we are not using baking soda in this recipe, vinegar stays in!
Oil AND butter – Yes, both are necessary in this recipe for best results! We love butter for flavour, but it doesn’t make things moist. Oil makes cakes moist but doesn’t add flavour. So use both!
Vanilla – Vanilla extract trumps artificial vanilla essence. Don’t waste vanilla bean on this recipe.
Cocoa powder – Just a bit, for the subtle chocolate flavour we know and love about Red Velvet! Standard cocoa powder is called for here, though the more intense flavoured dutch processed works just fine too.
Sugar – Caster sugar / superfine sugar works best here because it dissolves more easily into the batter. But granulated / ordinary white sugar can be used if that’s all you’ve got.
Red food colouring – To make the cupcake RED! Using ordinary food colouring (rather than intense gel) you need 1 whole tablespoon of red food colouring. If using gel, dip-and-smear a toothpick 3 times, and match the batter colour to the photos below.
Eggs – Make sure your eggs are at room temperature, not fridge cold, and are labelled “large eggs” which is an industry standard size in Australia and the US (55-60g / 2 oz each). The carton will be labelled as such.
Why do eggs have to be at room temperature? Because they incorporate better into the batter. Also, cold eggs mixed in with creamed butter makes the butter solidify again! Yep, been there, done that!
How to make Red Velvet Cupcakes
The making part is really no different to typical butter based cakes.
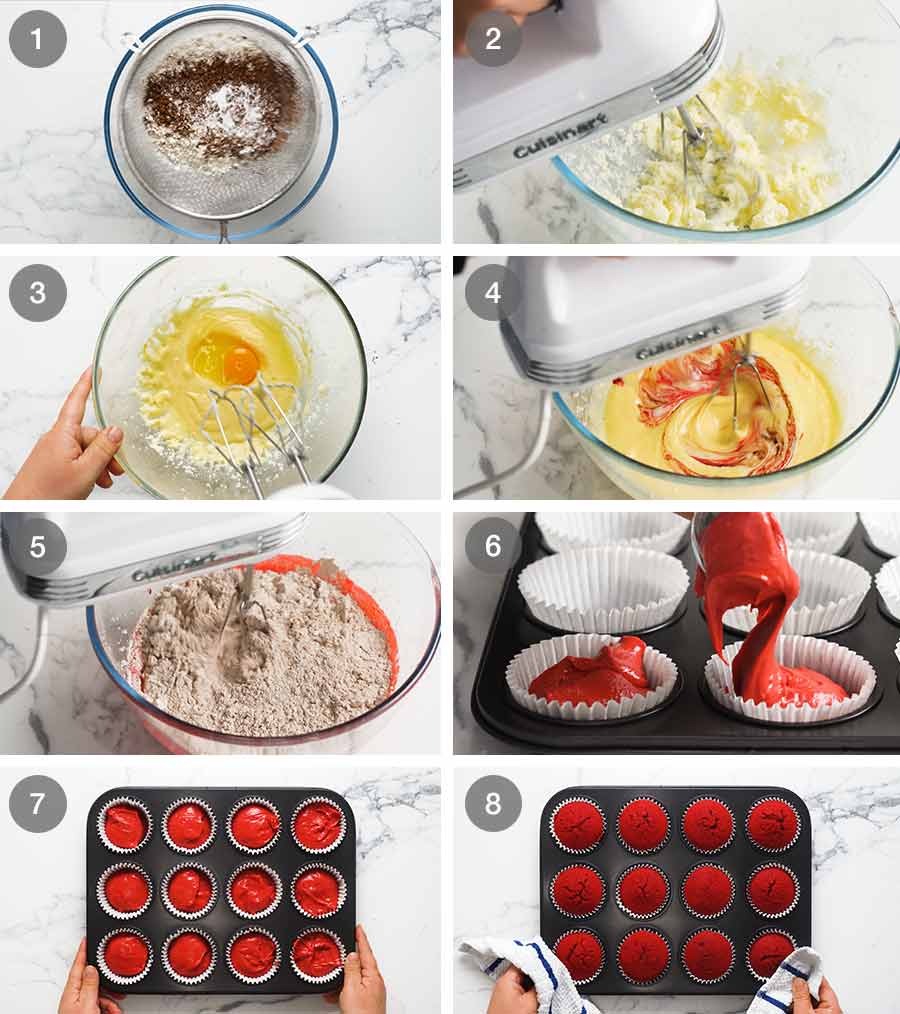
Sift the dry ingredients into a bowl so they’re lump free. I don’t like sifting, but in this situation, it’s necessary because cocoa powder has a tendency to get lumps in it.
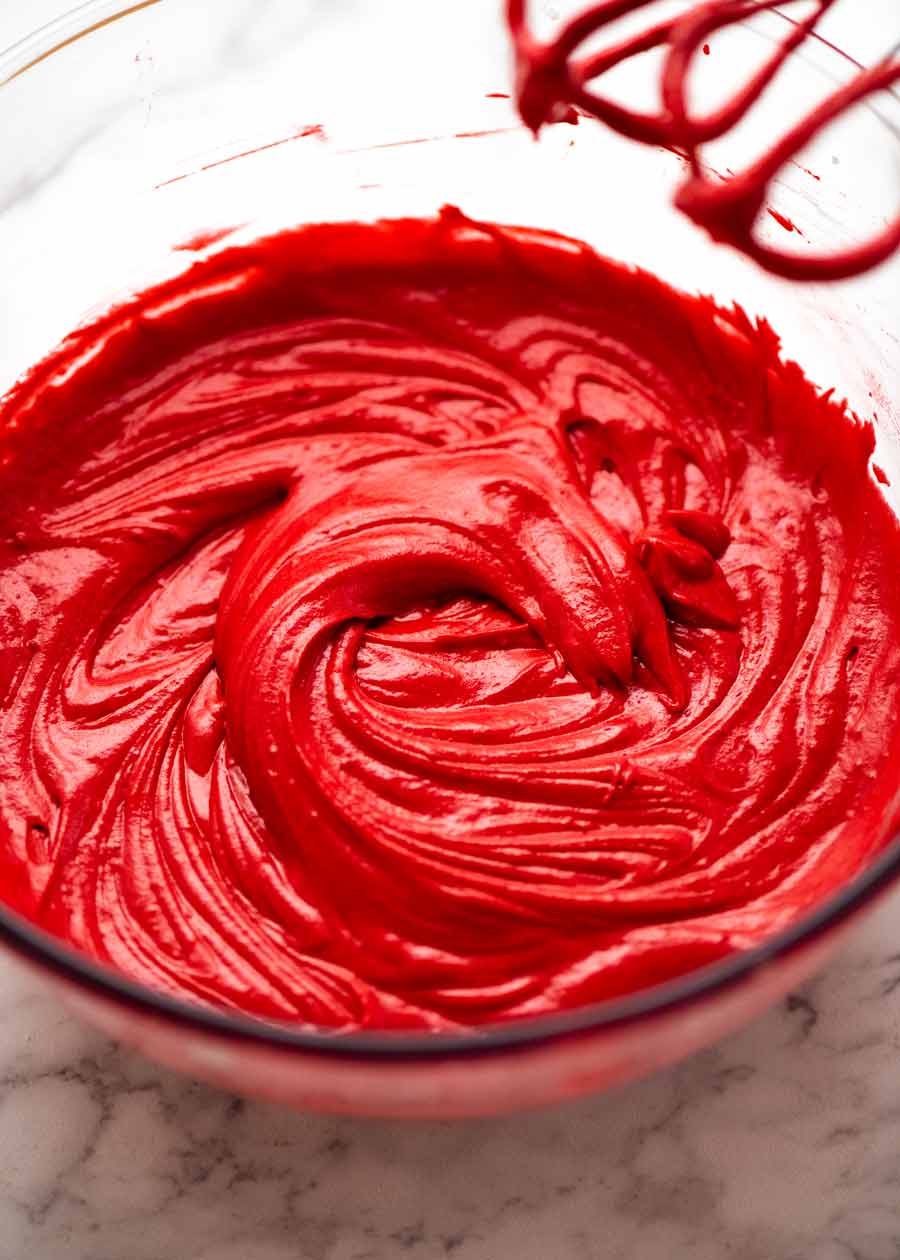
Cream butter, then sugar – Cream the softened butter and beat with an electric beater or a stand mixer for 1 minute until it’s smooth. THEN add the sugar and beat for a further 2 minutes until it’s fluffy and the butter has changed from yellow to very pale yellow, almost white.
Eggs – Add eggs one by one, beating in between until incorporated.
Oil, buttermilk, vinegar and vanilla – Then beat in remaining wet ingredients until incorporated.
Add Dry Ingredients – Lastly, add the Dry ingredients and mix for just 30 seconds until incorporated and you no longer see streaks of flour. There may be some small lumps still, and that’s ok. It’s better than over mixing which is a common mistake with cupcakes. This causes the batter to be over worked which makes the cupcake less tender.
Important – Once the dry ingredients are mixed with the wet ingredients, do not stop. Fill the muffin tin and get it in the oven quick smart. The reason is because once the wet ingredients are combined with the dry, the baking powder is activated. If you leave it sitting around, the baking powder will be bubbling away in the raw batter and by the time it’s baked, it won’t rise as well. This rule applies to all baking recipes!
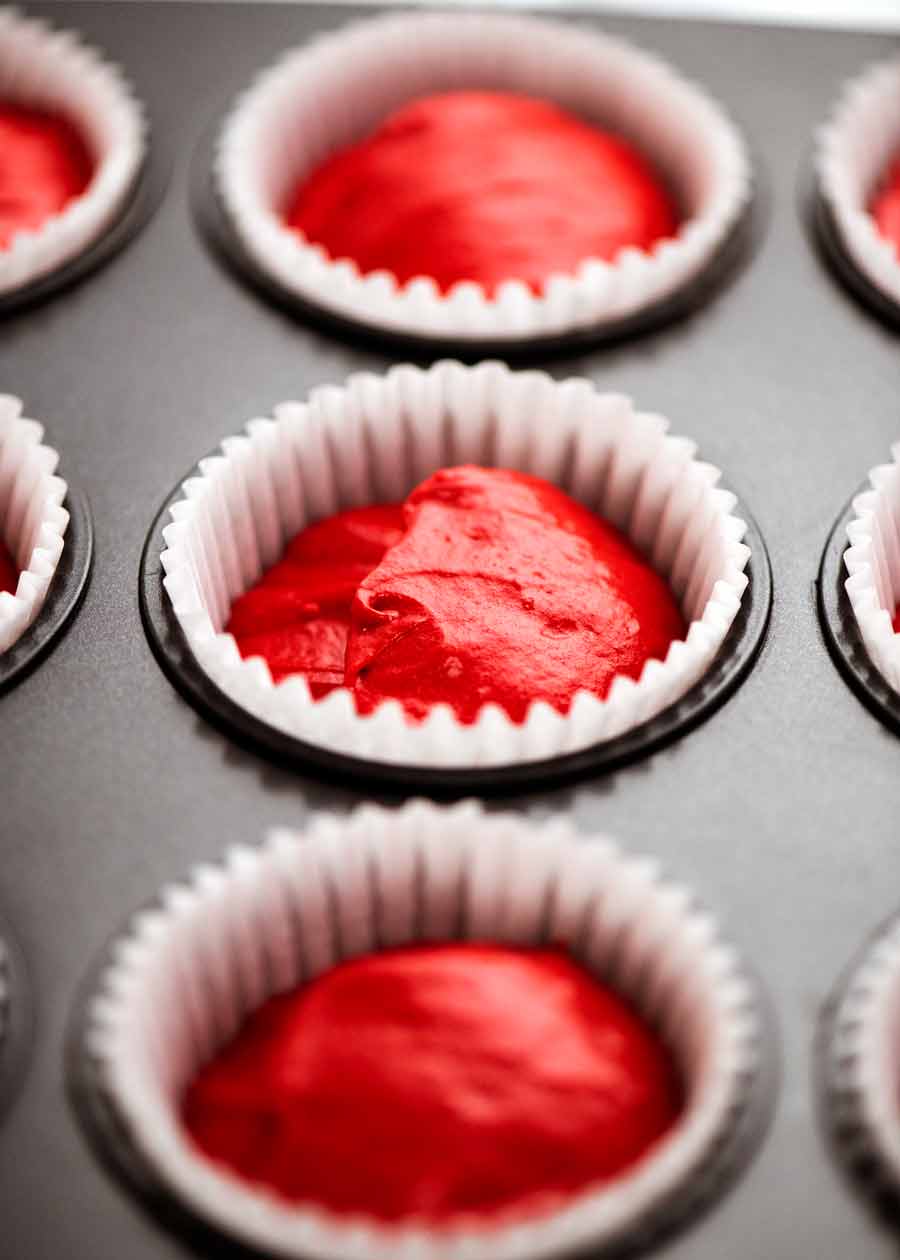
Fill muffin tin with the batter. It makes 12 perfect cupcakes, so divide all the batter between the 12 holes. If you use a standard muffin tin with cupcake liners the size I use, then it should fill the paper liners 3/4 of the way up to produce perfectly domed cupcakes!
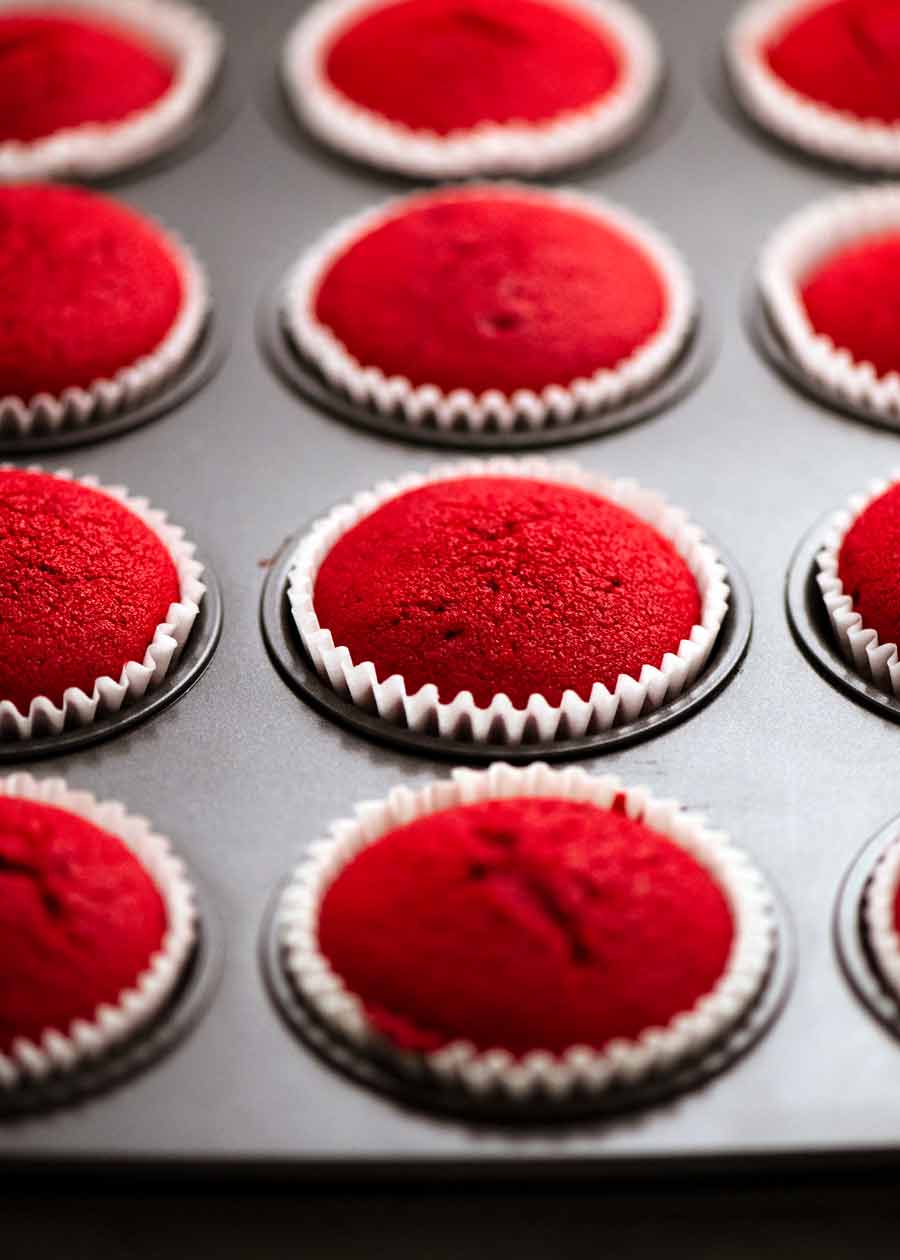
Bake for just 20 minutes in a 180°C/350°F (160°C fan) oven, or until a toothpick inserted in the middle cupcake comes out clean.
The surface of some of the cupcakes will be a little cracked. But that is absolutely no issue. Because in what world do people send out unfrosted cupcakes?? 😂
Cool completely before frosting. Warm cupcakes with butter based frosting = disaster! (In the form of melted frosting!)
Ingredients for Cream Cheese Frosting for Red Velvet
Cream Cheese is the most common frosting you see these days for Red Velvet Cake and Cupcakes, and that’s what I’m sharing today. The creamy, fluffy sweet frosting with the tang from cream cheese is a perfect match with the cupcakes!
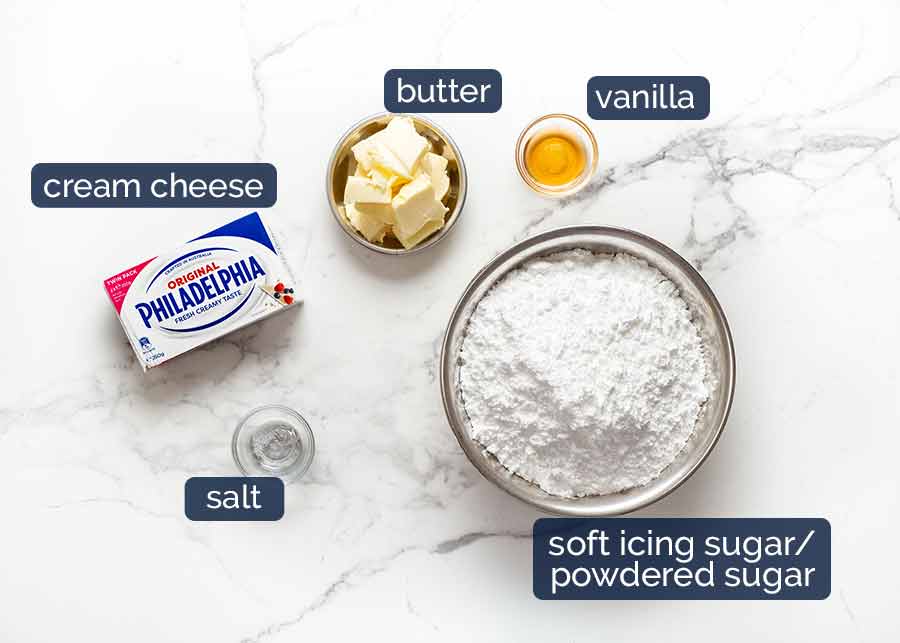
Cream cheese – Must be block, not the tub cream cheese which is softer as it’s the spreadable kind. If you use tub, the frosting will be too soft and sloppy.
Philadelphia is still my brand of choice, though these days better value brands are actually pretty good (I wouldn’t have said that 5 years ago!). Make sure it’s softened so it can be whipped to make it fluffy and creamy. If you’re in Australia, Philadelphia cream cheese these days is soft enough straight out of the fridge to whip. If you’re in the US, leave it on the counter for a bit.
Soft icing sugar / powdered sugar – Not to be confused with pure icing sugar which sets hard for things like royal icing, soft icing sugar / powdered sugar is a mix of cane sugar and tapioca or maize starch so it dissolves easily into frosting intended to be soft, fluffy and creamy.
Butter – To add richness to the frosting as well as giving it structure so it can be piped.
Vanilla – For flavour.
Salt – Just a pinch brings out flavour in baked goods!
How to make Cream Cheese Frosting
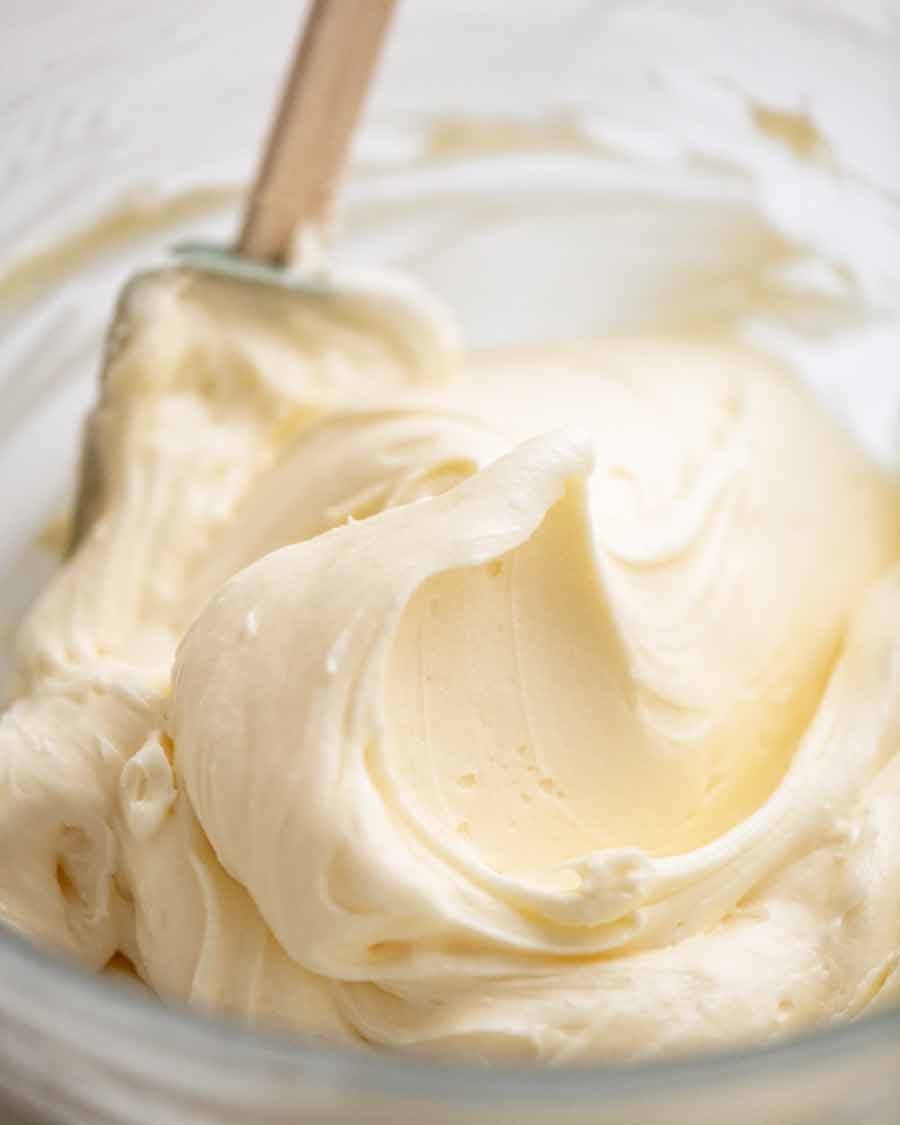
The trick to making a lovely fluffy, creamy cream cheese frosting is to beat, beat, beat. Oh – and to beat the butter first before adding the cream cheese, and to add the icing sugar in parts so you don’t get a dust storm in your face!
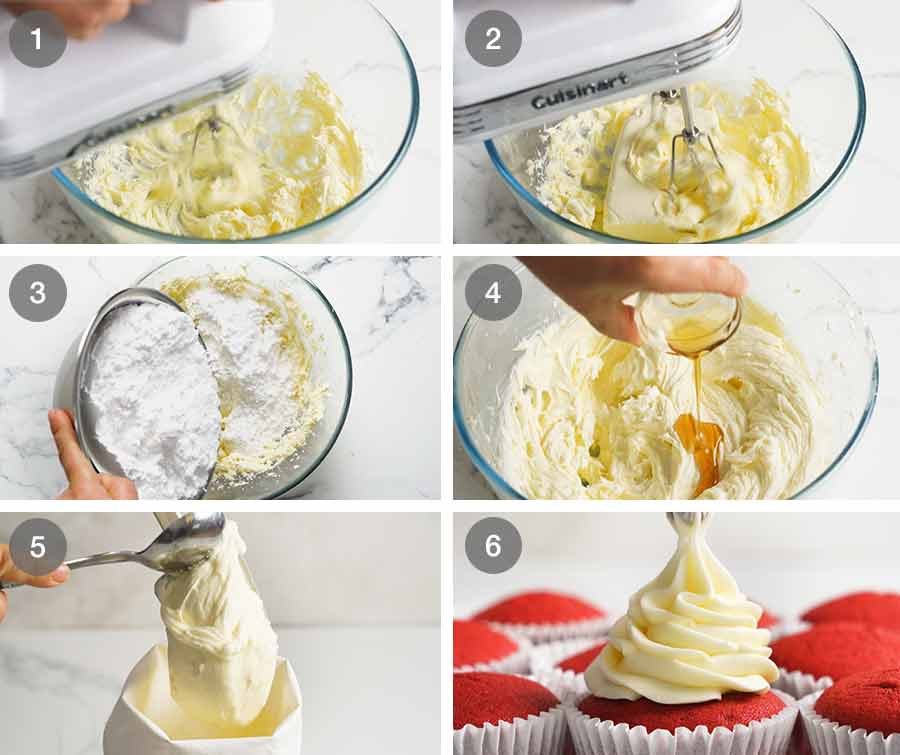
Cream butter: Beat the butter first for 1 minute until it’s smooth and starts to become paler in colour – speed 6 on stand mixer using the paddle attachment, or speed 9 for electric beater. I do this because the butter needs to be creamed longer than cream cheese. It also helps to make the frosting more white – butter changes from yellow to almost white the longer you beat it.
Cream cream cheese: Add cream cheese then beat for a further 1 minute on the same speed until smooth.
Add icing sugar: Add icing sugar in 4 batches, beating in between until incorporated, starting on speed 1 so you don’t get a dust storm in your face! If you do have dust storm problems, just place a clean tea towel over the bowl as you beat.
Beat until fluffy: Add vanilla and salt, then beat for 2 minutes until fluffy – speed 6 with stand mixer, speed 9 with electric beater. It should be creamy but still hold its shape in a peak (see video). If it’s too sloppy, place in fridge for 30 minutes, then beat again.
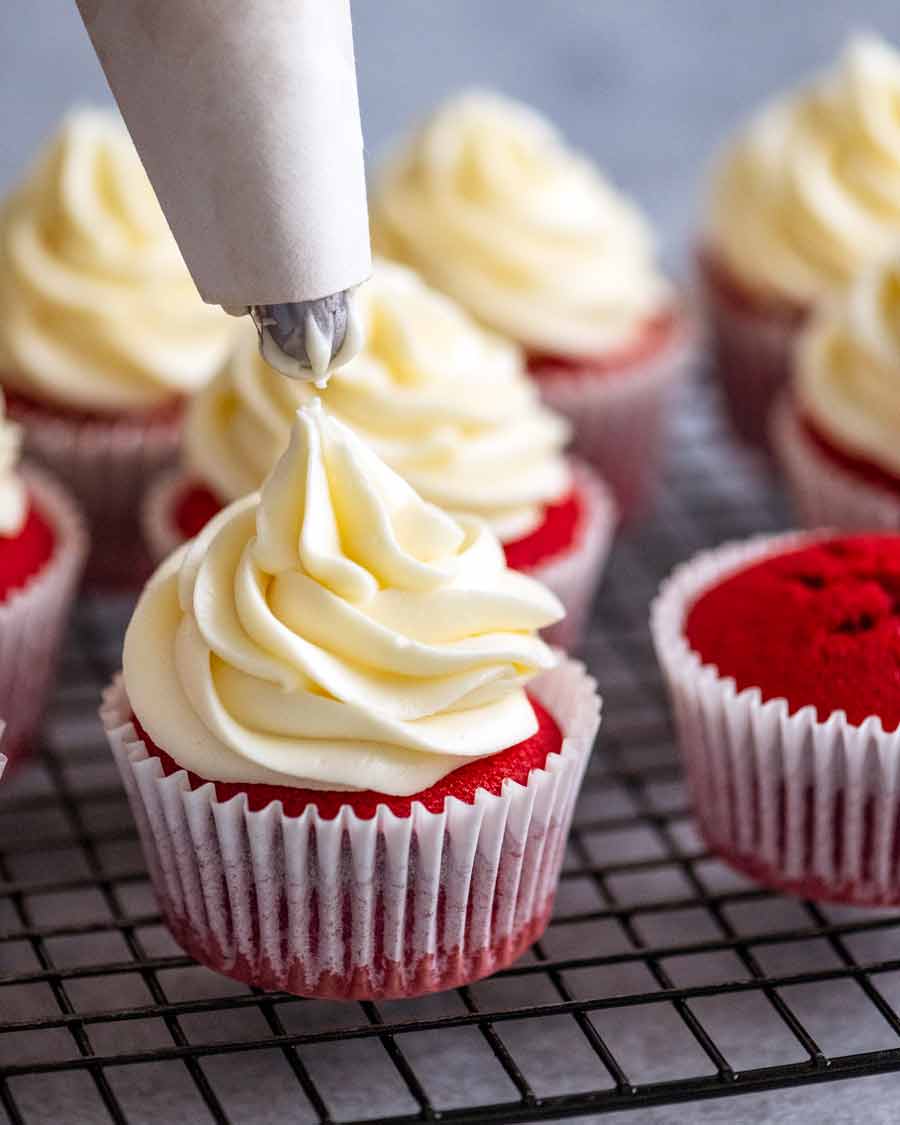
Piping bag: Transfer into piping bag with desired piping tip.
Pipe onto cupcake, swirling it up nice and high! This recipe makes enough to generously frost 12 cupcakes as pictured in post.
Fresh for 3 days – more tender than most!
You’ll find these Red Velvet Cupcakes are more moist and tender than the typical recipe, owing to the use of the combination of both butter and oil (as opposed to just butter) and the rather strict beating times I provide. Over beating is one of the most common causes of tough cupcakes with “rough” crumbs. Stick to the times I provide, and I guarantee you will have the most plush Red Velvet Cupcakes on the block!
The other benefit of extra soft Red Velvet Cupcakes is shelf life. Cupcakes are notorious for becoming quite dry the next day. But not these! The shelf life of these is 3 days in an airtight container. Keep them in the fridge if it’s warm where you are. The frosting will become firm, so be sure to bring to room temperature before eating so the frosting becomes nice and creamy again! – Nagi x
Watch how to make it
Hungry for more? Subscribe to my newsletter and follow along on Facebook, Pinterest and Instagram for all of the latest updates.
Red Velvet Cupcakes with Cream Cheese Frosting
Ingredients
Dry Ingredients:
- 1 1/3 cups cake flour (sub plain / all purpose flour, Note 1)
- 1 tbsp cocoa powder , unsweetened (Note 2)
- 1 1/2 tsp baking powder (not baking soda, Note 3)
- Pinch of salt
Wet Ingredients:
- 60g / 4 tbsp unsalted butter , softened (Note 4)
- 2/3 cup caster sugar (superfine sugar)
- 2 large eggs , at room temperature (Note 5)
- 1/3 cup vegetable oil (or canola)
- 1/2 cup buttermilk , at room temperature (Note 6)
- 1 tsp vanilla extract
- 1/2 tsp white vinegar (Note 7)
- 1 tbsp red food colouring (yes, 1 whole tablespoon!)
Cream Cheese Frosting:
- 1/3 cup unsalted butter , softened (Note 4)
- 170g / 6oz Philadelphia block cream cheese , softened (Note 8)
- 1/2 tsp vanilla extract
- 1/8 tsp salt
- 2 1/2 cups soft icing sugar mixture (powdered sugar) , sifted (Note 9)
Instructions
Cupcakes:
- Preheat oven to 180°C/350°F (160°C fan). Line a standard 12 hole muffin tin with cupcake liners.
- Sift Dry ingredients together into a bowl.
- Cream butter: Put the butter in a separate bowl and beat on speed 2 for 1 minute with an electric mixer or stand mixer (paddle attachment).
- Cream sugar: Add sugar then beat for a further 2 minutes, same speed, until the butter is very pale yellow, almost white.
- Beat in eggs: Add the eggs one at a time beating for 30 seconds on speed 1 after each addition.
- Add remaining Wet ingredients: Add oil, buttermilk, vanilla and red food colouring then beat on Speed 1 until incorporated and the batter is smooth.
- Beat in flour: Sprinkle the Dry ingredients across the surface and mix on Speed 1 for just 20 seconds. Scrape down sides of the bowl, then mix again for 10 seconds. The batter should now be smooth – few small lumps is ok. Do not keep beating – overworks batter = cupcakes not as soft!
- Fill pan: Divide the batter between the 12 cupcake liners – it should fill 3/4 of the way, but it depends on the size of the cupcake liners you use.
- Bake for 20 minutes or until a skewer inserted into the centre of the middle cupcake comes out clean.
- Cool: Immediately remove cupcakes onto a wire rack. Cool completely before frosting with cream cheese frosting.
Frosting:
- Cream butter: Place butter in a bowl and beat for 1 minute until it's smooth and starts to become paler in colour – speed 6 on stand mixer, speed 9 for electric beater.
- Cream cream cheese: Add cream cheese then beat for a further 1 minute on the same speed until smooth.
- Add icing sugar: Add icing sugar in 4 batches, beating in between until incorporated, starting on speed 1 so you don't get a dust storm in your face!
- Beat until fluffy: Add vanilla and salt, then beat for 2 minutes until fluffy – speed 6 with stand mixer, speed 9 with electric beater. It should be creamy but still hold its shape in a peak (see video). If it's too sloppy, place in fridge for 30 minutes, then beat again.
- Pipe: Transfer into piping bag with desired piping tip. Pipe onto cupcakes – makes enough to generously frost 12 cupcakes as pictured in post.
Recipe Notes:
Nutrition Information:
Life of Dozer
He’s such a good shoot assistant….
These cupcakes were amazing. The recipe was super easy to follow. I know they were good as the family keep requesting me to make more.
Ya know…now that I have time to cook…I’m learning that little details make a big difference…
So I read 1 Tsp for red food coloring…an my cupcakes came out brown in color….Huh….
Everything else turned out great….lesson learned…:)
Great recipe although there is a typo as it doesn’t say when to add the vinegar!
I added a tsp extra cocoa powder, only 2 tsp of red food dye and I doubled the vanilla extract in the icing
“Add remaining wet ingredients” is fairly self-explanatory, is it not?
I made this recipe yesterday for my daughters birthday party last night, using gluten free flour (Bob’s Red Mill 1-to-1 Baking flour), and the cakes were so moist, delicious and perfect. I had one for breakfast this morning and it’s still delicious and moist. Will definitely make it again. My daughter was very happy. Oh I also made the TinEats Chili Con Carne for the party, and the kids gulped it down. I’m relatively new to this website, and very grateful that I can trust your recipes for parties when making them for the first time.
I made this recipe yesterday for my daughters birthday party last night, using gluten free flour (Bob’s Red Mill 1-to-1 Baking flour), and the cakes were so moist, delicious and perfect. I had one for breakfast this morning and it’s still delicious and moist. Will definitely make it again. My daughter was very happy. Oh I also made the TinEats Chili Con Carne for the party, and the kids gulped it down.
Hi Nagi, I made this recipe over the weekend but had to triple up size, because i needed to make 45 of it, but obviously with the huge increase of oil, all the paper liners pulled away from the cupcake afterwards, so i couldn’t use it, how do i avoid this in future? I absolutely love love all your recipes!
Hi Nagi, did you know Cake Flour is banned in New Zealand, I googled how to sub the cake flour, thought you may not know ( I didn’t ) until this recipe, which is fantastic by the way 🙂
Followed the recipe to a tee (with the exception of cake flour actually, I used AP flour instead) and came out with moist and delicious cupcakes! Thanks for this fantastic recipe.
These are the best chocolate cupcakes I’ve made! Made in my thermomix by heating the choc and butter, mixing the wet ingredients, then adding and mixing the dry ingredients. I used left over lindt milk choc easter eggs and coconut oil, topped with chocolate cream cheese frosting and these were next level delish. Will definetly make them again!!
My friend and I baked these for my birthday and they turned out great, despite how we together aren’t very good at baking… because I tend to forget to add ingredients, but not this time!
Dear Nagi, what kind of vinegar would you recommend we add? Thank you!
Thank you for this recipe ! Absolutely delicious every-time i use this recipe ! 3rd time making it and it’s yummmmy !
Hi Nagi, can we make these in advance and freeze them? Will then add the frosting on the day. Will the cupcakes be ok? Thank you.
Best red velvet recipe!
I made this recipe exactly as written except I made 42 mini cupcakes. 1 tablespoon batter per cavity and baked for 10 minutes. Of all the red velvet recipes this one is by far the best. Great flavor and perfect rise. Easy recipe. Thanks Nagi.
Hi Nagi, how would I modify the oven time for mini cupcakes?
Delicious recipe!
What size cupcake liner do you use? I used standard sizes (from Woolies) but the cupcake doesn’t fill the liner, there’s about a 0.5cm gap between the cupcake edge and the top of the liner.
This recipe was really easy to make and delicious! one thing I noticed though was vinegar was listed in the ingredients but not in the method just wanted to let you know.
Thank you Nagi!
I don’t know why I didn’t use your recipe first but I have tried 3 others this weekend and they were all awful. I literally threw them in the bin! Just made two dozen of yours and they are perfect!!
You’re the bomb Nagi.
SO creamy, and extra tender. Used straight icing sugar, extra hard icing. So sweet, tender, soft. I love a good creamy base on icing. Top good recipe. Good eats for me and my boys.
Made these exactly as suggested and took them to a family BBQ everyone hated them and said it tasted like playdoh! Why would this have happened please?
you added to much playdoh ROFL
Because you are shit at baking. Follow the recipe and grow up, arsehole.
It is most likely because you might’ve forgotten an ingredient like vitally sweet foods like sugar, salt, and vanilla extract. I hope that helps, sorry if I couldn’t.