
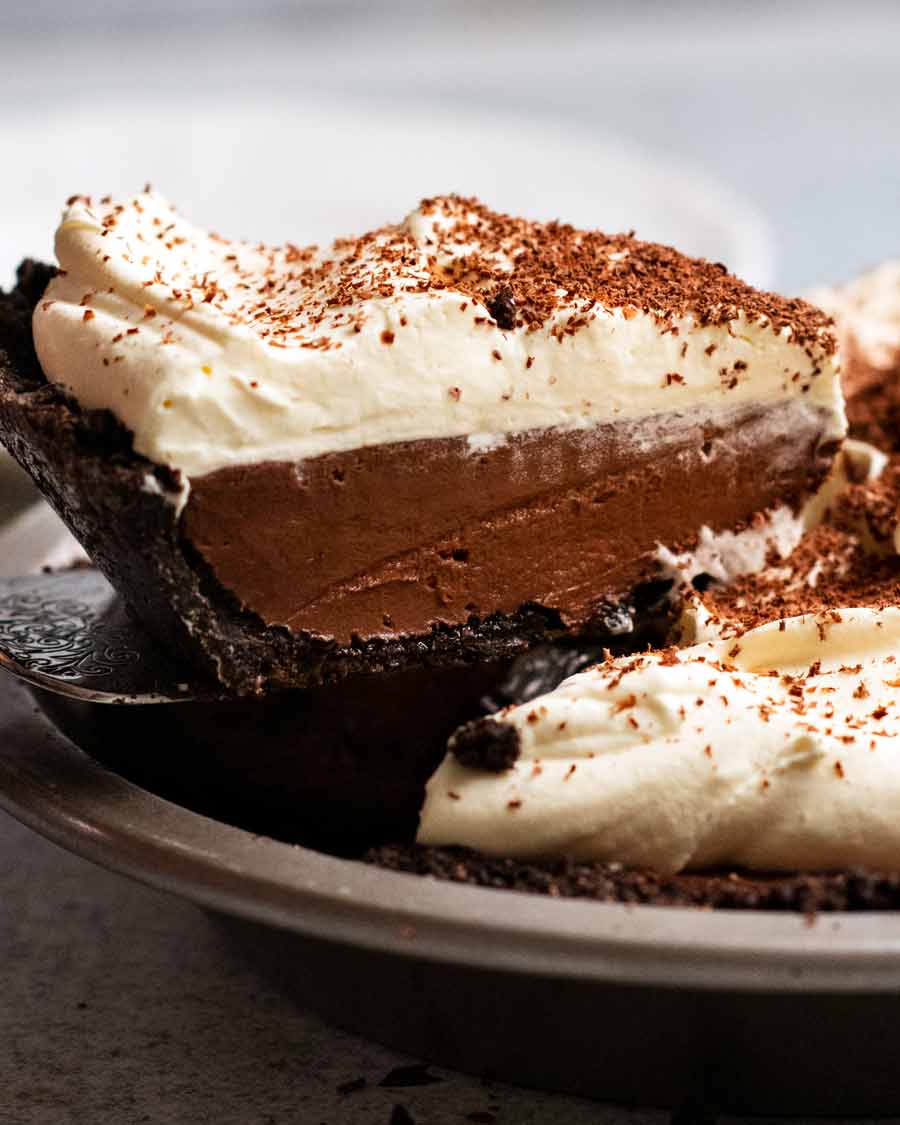
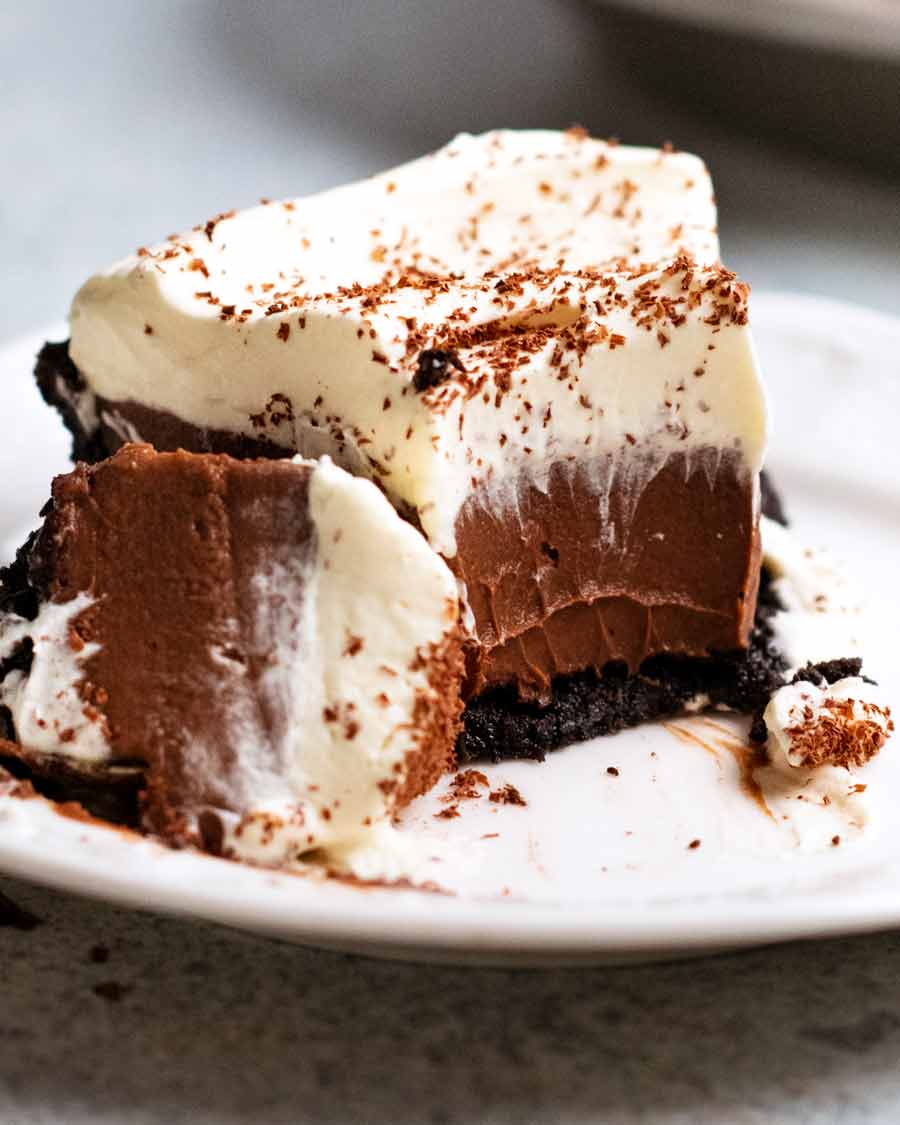
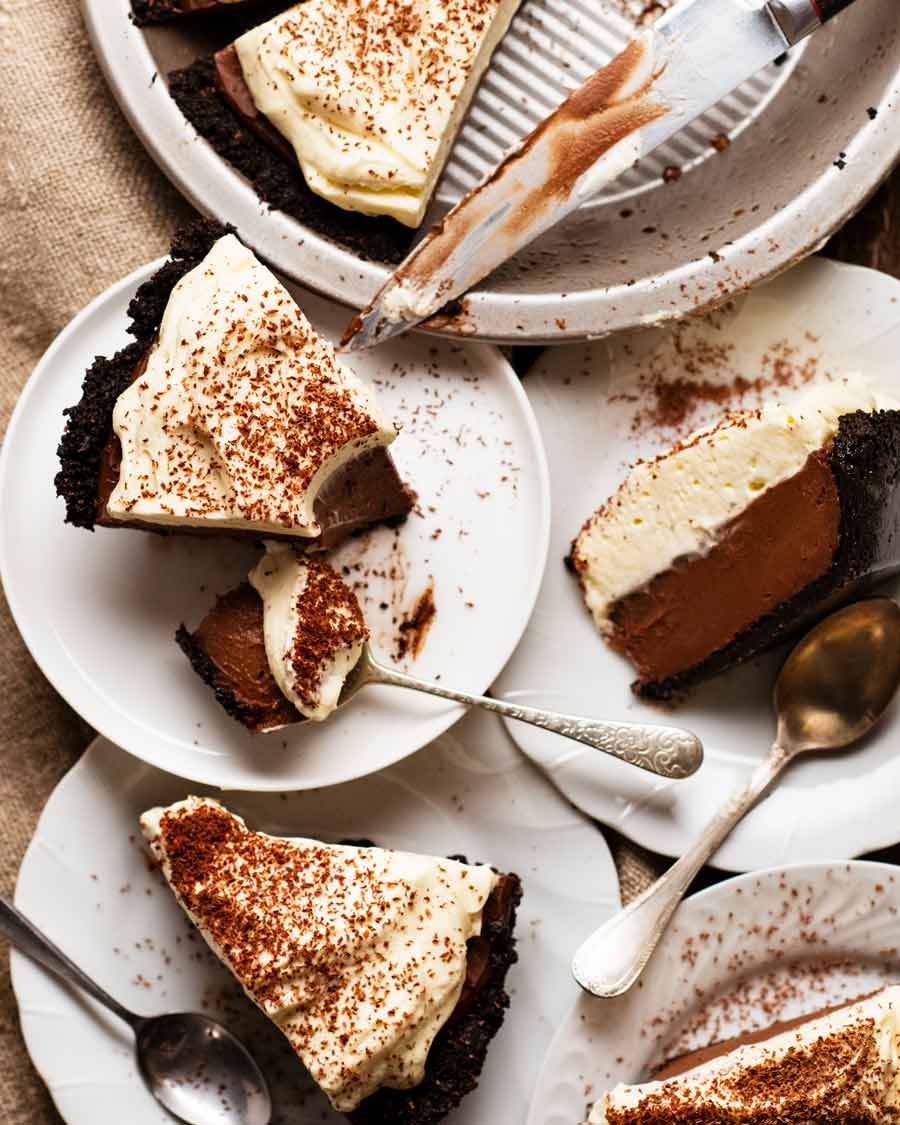
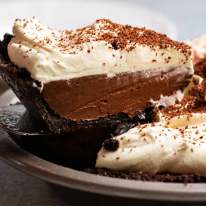
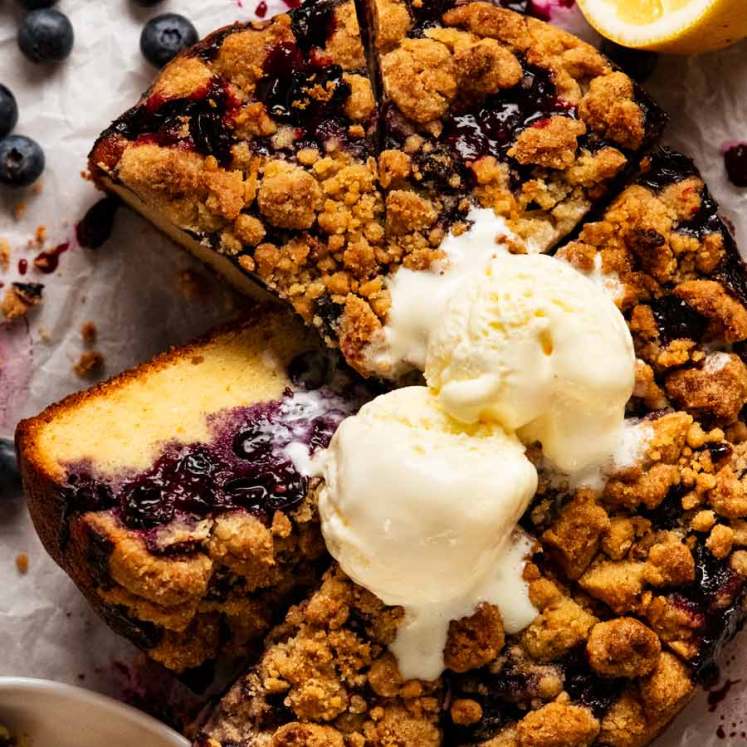
A magnificent Chocolate Cream Pie with a chocolate biscuit base, a creamy smooth chocolate custard filling, topped with clouds of cream. Also known as a chocolate pudding pie, it tastes like a cross between chocolate mousse and Chocolate Bavarian Pie!
Chocolate Cream Pie
As a kid, I’d get so excited on the rare occasion my mother would splurge on a chocolate bavarian pie. I’m talking about the kind sold in the freezer section of supermarkets. Not a fancy patisserie cake made with the beautiful French bavarian cream, crème bavaroise.
I thought it was the best thing ever. Just the right amount of crumbly biscuity base. That chocolatey creamy filling.
And it would still be the best thing ever had I not learnt to cook it myself! While the biscuit base isn’t too different, the chocolate layer is absolutely no comparison. Homemade has real chocolate flavour and a mouthfeel that store-bought never will.
My childhood bavarian pie also evolved with the addition of a generous cloud of whipped cream, which is just heavenly with the chocolate filling, Hence, re-christened as a Chocolate Cream Pie.
I could eat this every day. I predict you will feel the same!
What’s in a Chocolate Cream Pie
This Chocolate Cream Pie is a classic combination with:
chocolate cookie base – made from Oreo cookies which gives it an extra intense chocolate flavour.
chocolate filling – it’s essentially a pudding, a creamy-but-light custard chocolate filling. If you want to get fancy, it is in fact a type of French chocolate custard called crème pâtissière. Fancy it may sound, but it’s actually a surprisingly simple custard that you see contestants in reality cooking shows frantically stressing about making silky smooth and thick, rather than gritty and runny.
I’m sorry, but I don’t get it. It’s not hard to make. Not if you follow the very few simple steps required to make it! You’ll see in the recipe video. 🙂
whipped cream – the pie is topped with a mound of fluffy lightly sweetened vanilla whipped cream.
Dreamy is a word that comes to mind!
Ingredients in Chocolate Cream Pie
1. Chocolate filling ingredients
This custard / pudding is thickened with a combination of cornflour/cornstarch and egg yolks, enriched with butter and cream and flavoured with melted chocolate. It is DIVINE!

Chocolate – I use a combination of 70% cocoa dark chocolate and milk chocolate for my ideal balance of chocolate flavour intensity (70% cocoa) and creamy chocolatey-ness (milk chocolate).
Egg yolks – This helps the custard thicken and set as well as giving it a luxurious mouthfeel that frozen Sara-Lee chocolate bavarian pies can ever compare to!
Also, here is a list of what I do with leftover egg whites.
Cornflour / cornstarch – This is also used to thicken the custard.
Cream and milk – The liquids for the custard. Cream is not typical for custards but it adds richness here! You can just use milk, if you’d prefer.
Butter – This adds yet more richness into the custard.
Sugar for sweetness (this is not overly sweet), vanilla for flavour and a pinch of salt to bring out the flavours (standard sweet baking practice these days).
**Forget Cool Whip** Shortcut recipes for chocolate pie fillings are pretty common on the internet. Some are made with Cool Whip (Australia, we don’t have this and I hope we never do, it’s an artificial thickened “cream” filling), or boxed chocolate pudding powder, marshmallows (too sweet for my taste), or a simple ganache filling (which is very dense and very rich).
For me, I believe that there are some things that should be done right. And if we’re going to make a homemade Chocolate Cream Pie – let’s make the best one we can! I promise it trumps boxed pudding powder. 🙂
2. Oreo Cookie pie base ingredients
I like making Chocolate Cream Pie with an Oreo Cookie pie crust. Made with crushed Oreo cookies, there’s terrific texture contrast with the creamy filling and an extra hit of chocolate. I also like the dark almost-black colour.
Here’s what you need:
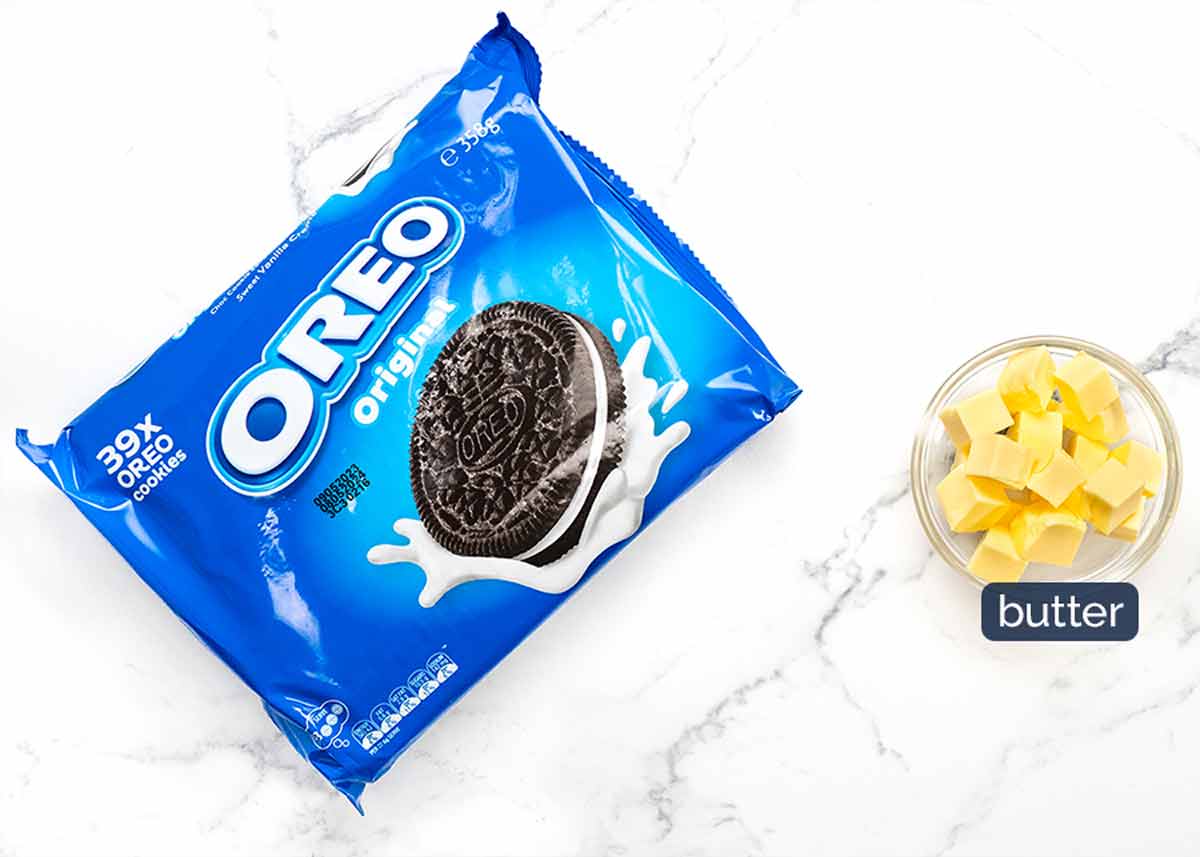
Oreo biscuits – I like using Oreo cookies for the texture and flavour, I find they’re more chocolate-y than most other chocolate biscuits. But any plain chocolate biscuits / cookies will work fine here, such as Arnott’s Chocolate Ripples.
Melted butter – This is what makes the Oreo crumbs hold together to form a crust.
vanilla Whipped cream
And here’s what you need for the fluffy mound of whipped cream:
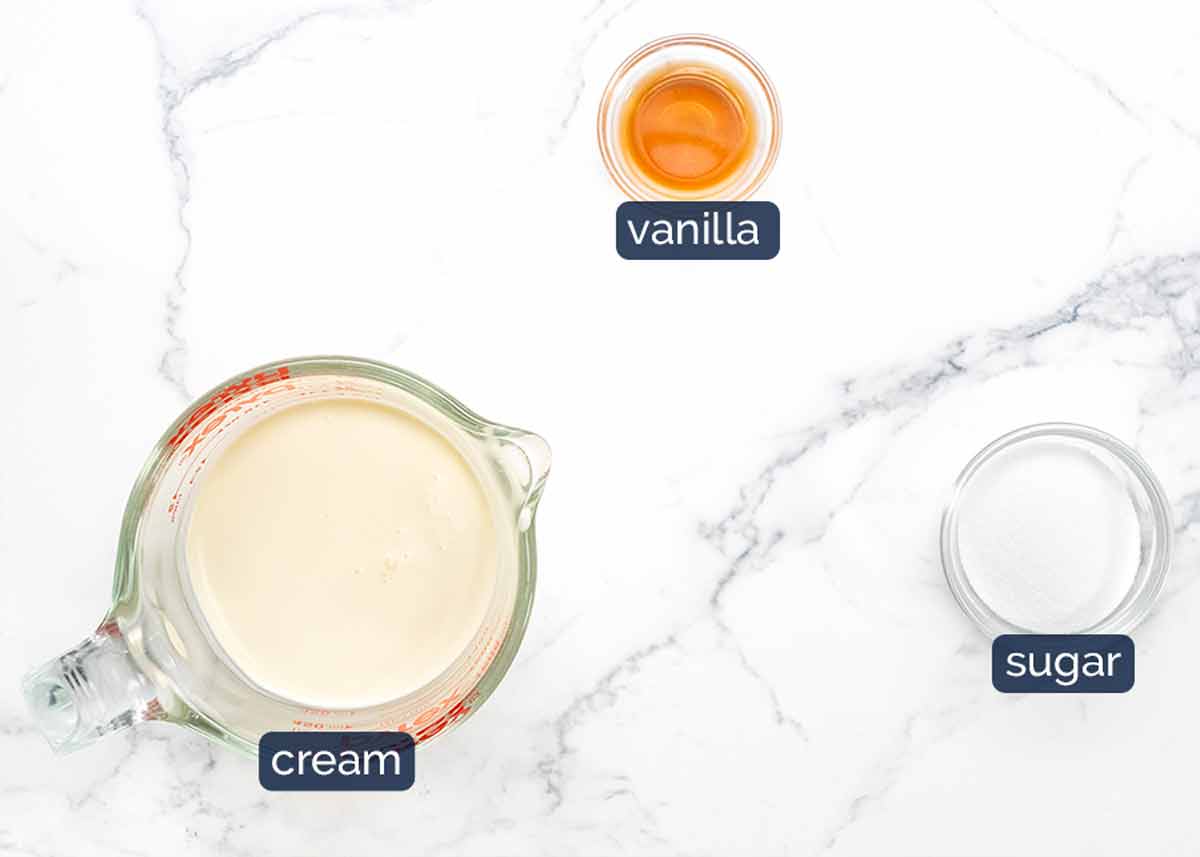
Whipping cream – Make sure you use cream that can be whipped. Not all creams are, some are made for just pouring or dolloping. Read the label to check. And – NO LOW FAT! 🙂
Vanilla for a touch of lovely flavour.
Sugar – Not too much. Just a bit, to lightly sweeten.
How to make Chocolate Cream Pie
This is an almost no-bake recipe. The crust is baked for 10 minutes to make it extra crisp. The custard-pudding filling is cooked on the stove, poured into the crust then refrigerated overnight to set.
1. how to make the pie crust
I use a food processor to blitz the Oreo cookies. It takes seconds!
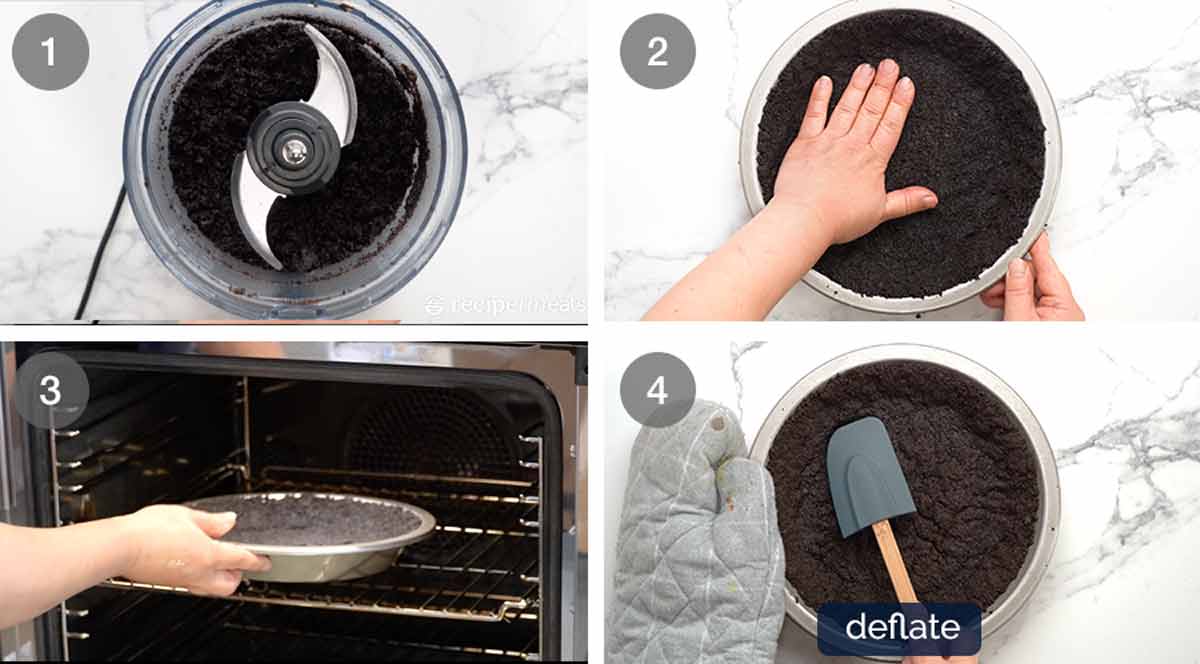
Blitz – Roughly break up the Oreo cookies by hand and drop into a food processor. Blitz into fine crumbs (~5 – 10 seconds). Add melted butter then blitz briefly just to mix through. The mixture should resemble wet sand.
Press – Pour into a 22.5cm/9″ pie tin. Use your hands / rubber spatula / something flat to press the crumbs firmly into the base and walls.
Bake for 10 minutes at 180°C/350°F (160° fan-forced). This makes the pie crust crisper.
Deflate – The crust puffs up in the oven. Gently deflate using a rubber spatula or similar – the base and walls. This too makes the pie crust crisper and firmer.
2. how to (EASILY) CUT A ROUND FROM PAPER
Before we get into the fun chocolate filling making part, a quick little tip for how to cut a circle from paper. Do this before you start the custard so you can cover the custard as soon as you pour it into the crust. It prevents a skin from forming on the surface which starts pretty quickly.
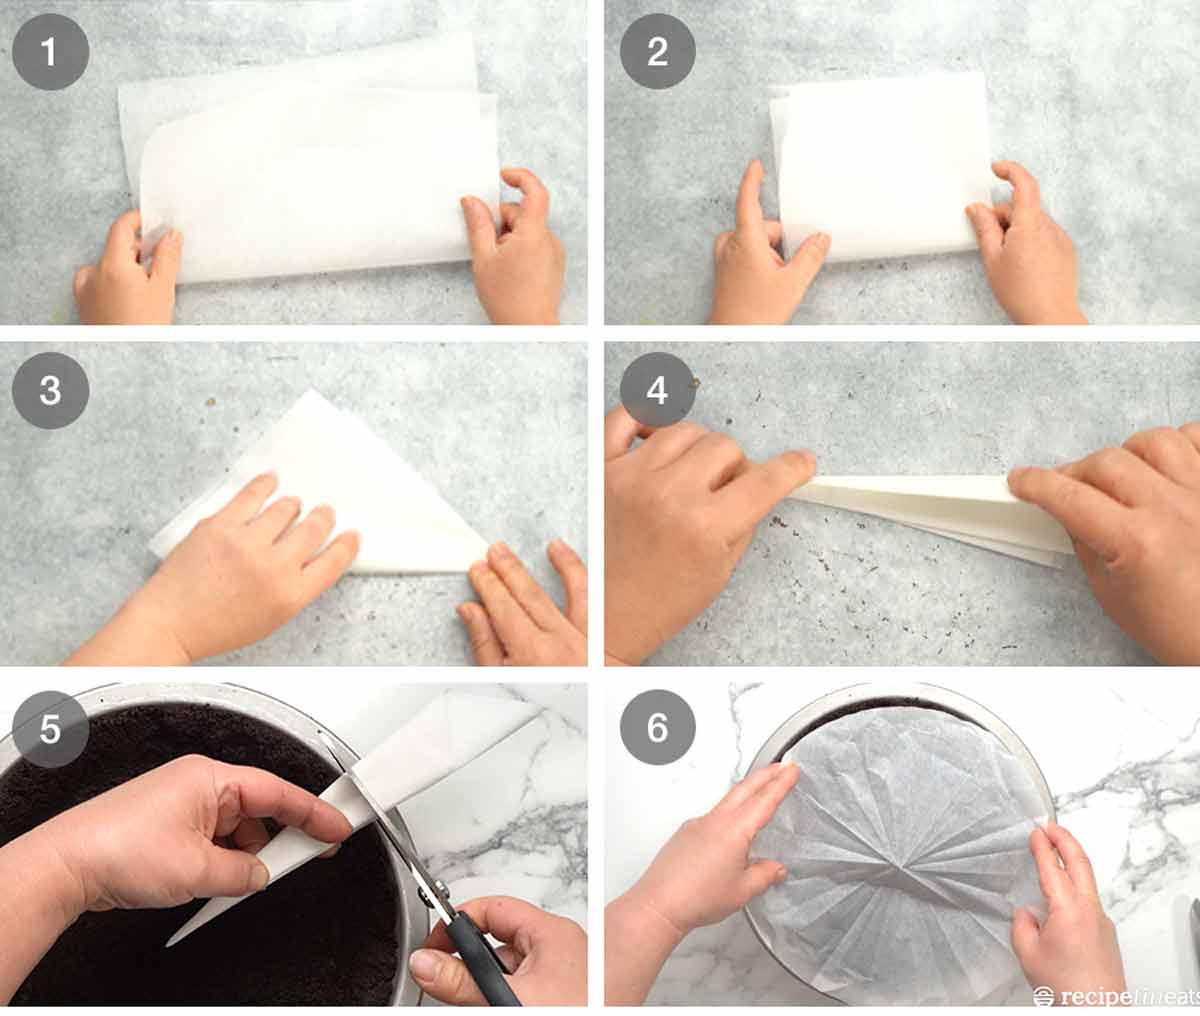
Baking paper – Tear a sheet of baking paper larger than the pie tine, then fold in half.
Fold in half again.
Then fold into a triangle.
Keep folding to form a long thin triangle.
Measure how large your pie dish is by placing the tip of the triangle above the centre of the pie tin. Cut off the end.
Then unfold. Voila! Neat circle that covers your pie!
3. how to make the chocolate filling
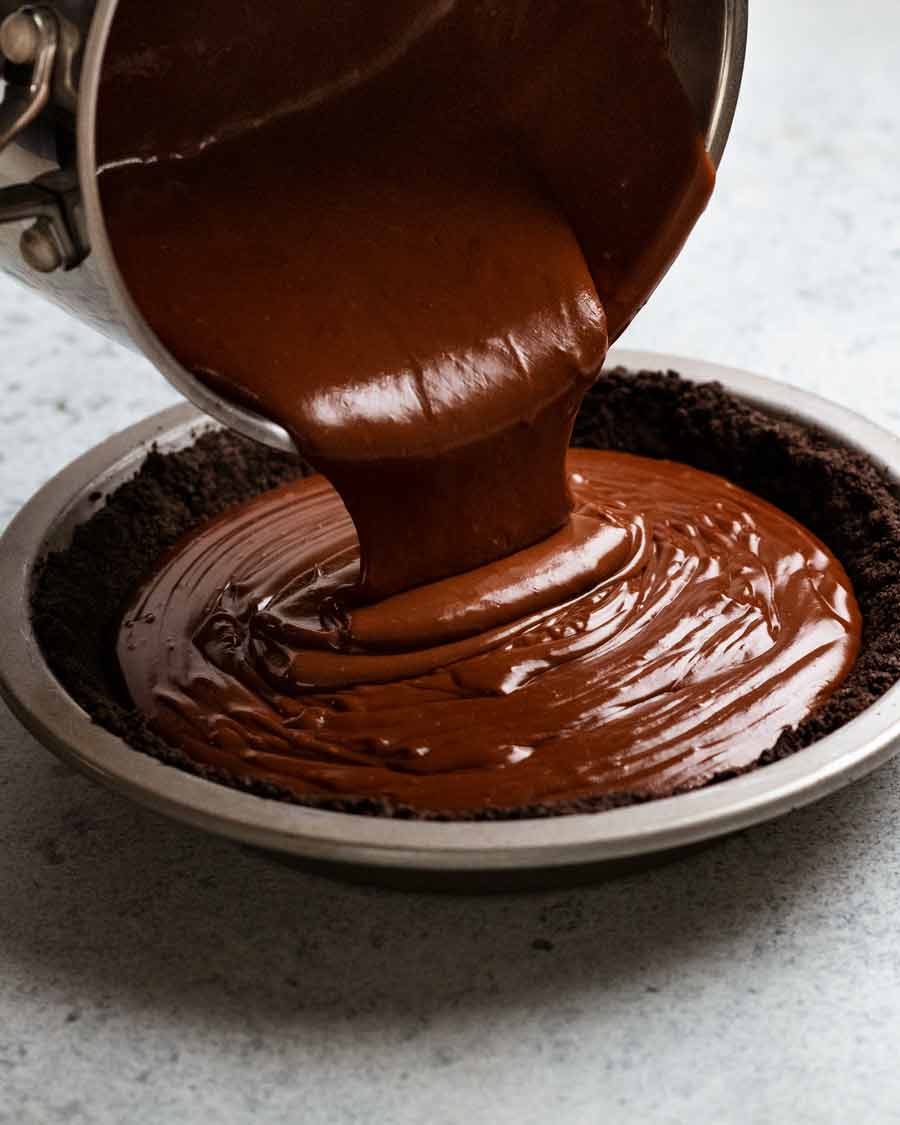
The chocolate filling ingredients are simply whisked on the stove which thickens into a custard as it heats up. The custard is pourable when hot, then sets so it’s cuttable once refrigerated.
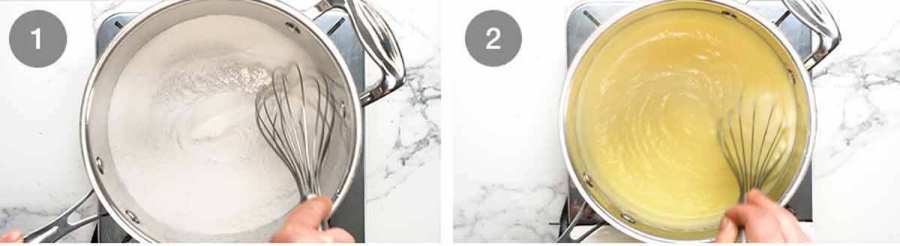
Whisk dry – Place cornflour, sugar and salt in a medium saucepan. Whisk to combine.
Add liquids – Add milk, cream and yolks. Whisk to combine. Then whisk every now and then over medium high heat (or medium for strong gas stoves) as the mixture is heating up. Once the liquid is hot (around 3 – 5 minutes, you’ll see steam), turn the stove down to medium low and start to whisk constantly to ensure the base doesn’t catch. You will feel and see the mixture starting to thicken into a custard.
45 second whisk to finish – When the mixture starts bubbling (around 4 minutes), whisk constantly for 45 seconds then take it off the stove. To see the bubbles, you will need to pause whisking. They will be slow, lazy bubbles! See video at 1:49 here.
Lumps? Don’t fret! Take it off the stove and whisk vigorously, you should be able to whisk them out. Once smooth, return to the stove and continue. As a last resort, you can strain the custard at step 5.
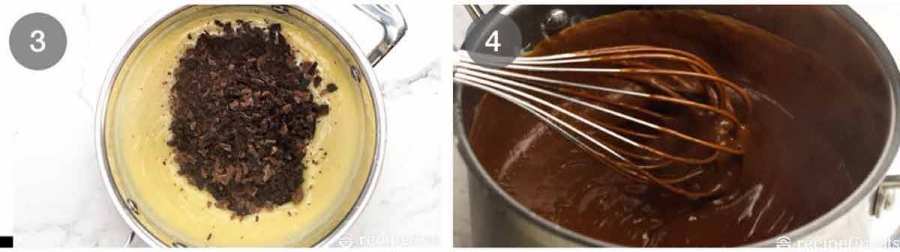
Melt in chocolate – Remove off the stove. Add butter, chocolate and vanilla and whisk until the chocolate melts and the filling is smooth.
Thickness – The custard should have a thickness like honey. It will be pourable, but won’t mound.
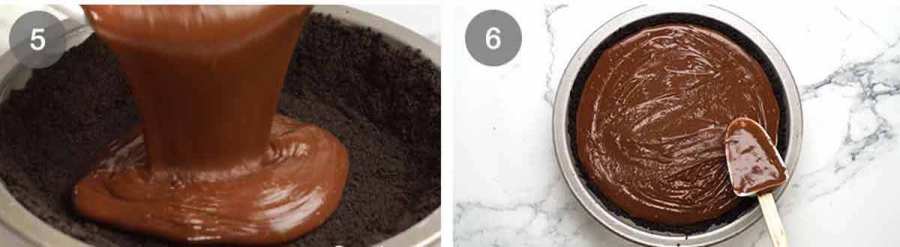
Pour the custard straight into the pie crust.
Smooth the surface.
4. Setting and decorating
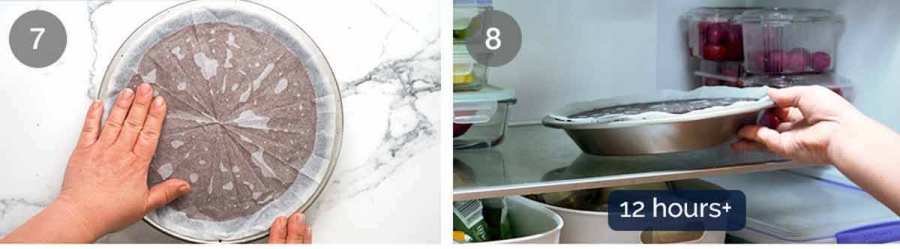
Cover – Immediately cover with a round piece of baking/parchment paper, pressing lightly so it is in contact with the surface. This will prevent a skin from forming. (Don’t use cling wrap, you’ll peel a thick layer of custard off which I know you’re thinking well then I get to lick it all off! But the reality is it’s actually quite difficult to do off cling wrap. Yes, I know from first hand experience. Stick with paper!!)
Refrigerate for 12 hours+ – Cool on the counter. Then refrigerate for 12 hours+ to ensure the custard fully sets.
Don’t try to shortcut it and don’t think that you can cut a slice at the 3 hour mark because it seems pretty set! If you cut out a slice before it’s fully set, you will break the custard in the whole pie and it will never set again. Again, I know this from first hand experience from testing variation iterations of this Chocolate Cream Pie as well as this recipe, this recipe and this recipe!

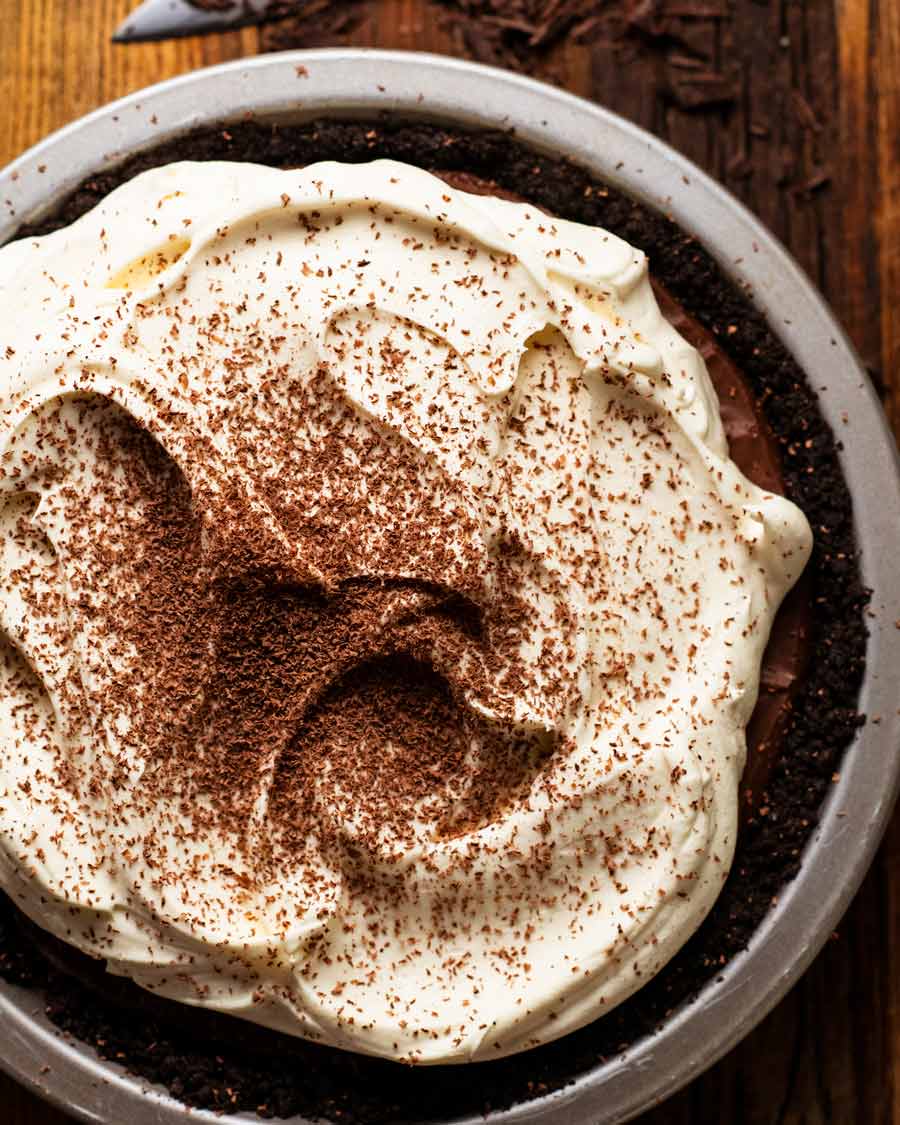
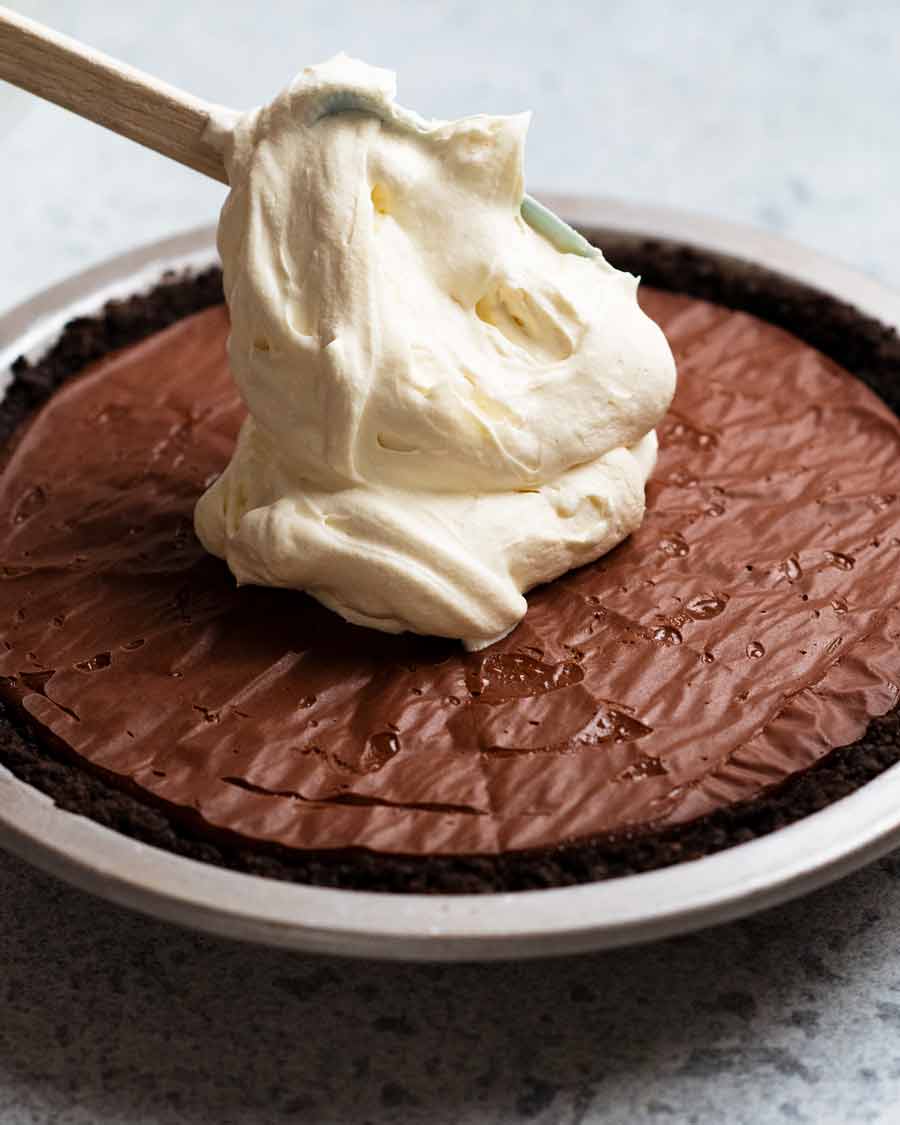
Cream – Carefully peel off the paper then top with whipped cream.
Garnish with a sprinkle of grated chocolate, if desired. Then, it’s ready to devour!

Matters of serving and eating
Because it’s a pie, it’s best to serve it out of the pie tin. Removing the whole pie would be risky! Cut in the pie tin and lift (pulling the first slice out neatly is always a little tricky, if necessary, I will resort to a rubber spatula to get right underneath). The Oreo cookie crust holds together when sliced (see video and photos) but it crumbles a bit as you start eating it which makes the whole eating experience even better. Because, imagine this:
A big mouthful of rich, smooth, chocolatey filling with clouds of fluffy cream PLUS little bits of crumbled Oreo cookie…..
It’s just perfection! – Nagi xx
PS If you want to make this ahead, do it up to 2 days ahead without the whipped cream weeping, then stabilise the whipped cream by adding marscapone. Information about stabilised whipped cream here, recipe is in the notes of the recipe card below.
Watch how to make it
Hungry for more? Subscribe to my newsletter and follow along on Facebook, Pinterest and Instagram for all of the latest updates.
Chocolate Cream Pie
Ingredients
Crust:
- 25 Oreo biscuits , whole with filling in tact (244g / 8.5 oz) (Note 1)
- 60g / 4 tbsp unsalted butter , melted
Filling:
- 1/4 cup cornflour / cornstarch
- 2/3 cup caster sugar (superfine sugar)
- Pinch of salt
- 2 cups milk (whole or reduced fat, not zero fat)
- 1 cup cream (pouring or thickened/heavy), or sub with milk (Note 2)
- 4 egg yolks from large eggs (Note 3 for leftover whites)
- 2 tbsp / 30g unsalted butter , cut into 1cm / 0.5" cubes
- 1 tsp vanilla extract
- 150g/ 5 oz dark 70% cocoa chocolate or bittersweet chocolate, finely chopped (Note 4)
- 75g/ 3 oz milk chocolate , finely chopped (Note 4)
Whipped cream
- 1 1/2 cups thickened / heavy cream , for whipping
- 2 tbsp white sugar
- 1/2 tsp vanilla extract
Optional garnish
- Chocolate , for grating (optional decoration)
Instructions
- Preheat oven to 180°C/350°F (160° fan-forced).
- Cut round paper – Cut a round piece of baking / parchment paper, the size of the pie dish (to prevent skin forming on custard). (Note 5)
Oreo cookie crust:
- Blitz – Break up Oreos roughly by hand and place in a food processor. Blitz into crumbs (~10 sec). Add butter, blitz to mix through. Mixture should resemble wet sand. (No food processor? Bash in ziplock bag with a rolling pin).
- Press – Pour into a 23cm / 9" pie dish. Spread crumbs out and press firmly into the base and up the walls using your hands, spatula or something flat.
- Bake for 10 minutes. Remove from oven – the crust will be slightly puffed. Press down gently using a rubber spatula (makes it even crustier!) then allow to cool on the counter before filling.
Filling (see video, it's helpful):
- Whisk dry, then wet – Place cornflour, sugar and salt in a large saucepan. Whisk to combine. Add milk, cream and yolks. Whisk to combine.
- Heat to thicken – Turn heat onto medium high. As the mixture warms up, whisk every now and then, but not constantly. As the liquid starts to get hot at around the 3 – 5 minute mark (you'll see steam), turn the stove down to medium low and start to whisk constantly. You will feel and see the mixture start to thicken. Got lumps? See Note 6!
- 45 second whisk – When you see slow, lazy bubbles (~6 minutes, you will need to pause whisking to see bubbles), whisk constantly for 45 seconds then take it off the stove.
- Chocolate and butter – Add butter, chocolate and vanilla. Whisk until chocolate melts and filling is smooth.
Assembling / setting custard
- Pour hot filling into pie crust, filling it right to the top, smooth surface. Gently place round baking paper on surface. (Surplus custard? Note 7)
- Cool on the counter for 2 hours then refrigerate for 12+ hours to allow the custard to fully set.
- Whipped cream – Beat whipped cream ingredients in a bowl on high for 2 to 3 minutes until softly whipped.
- Topping – Carefully peel back paper. Pile on the whipped cream, then grate chocolate across the surface.
- Serving – Keep the pie in the pie tin. Cut and serve!
Recipe Notes:
Nutrition Information:
Originally published in 2017. It’s such a personal favourite, I really wanted to re-publish it with better photos and a much improved recipe video. My skills have improved over the past 5 years with lots of practice!
Life of Dozer
Normally when I re-publish a recipe, I add a new Life of Dozer photo. But this one from 2017 is so lovely, I don’t want to change it!
From 2017, as originally published:
Not just food photos that Dozer photobombs….. This is a magnificent sun rise we had earlier this week. Once a year thing. Pretty, isn’t it?


Made this for Thanksgiving here in the US in 2023 and it was the total hit of the dessert table. Everyone wanted the recipe. Very easy. Videos were great and helpful. I had to cook the custard maybe a little longer as I was using a small low burner but I whisked it constantly after it started steaming and no lumps! I used Ghiradelli chocolate chips in the suggested ratio of dark to milk and I didn’t need to chop anything. They just melted into the custard right away.
For fun I crushed up some dark chocolate peppermint bark and sprinkled on top of the whipped cream.
Will definitely make again! Thank you!
WOW!!! Everything perfect; no lumps, no disappointments. Best ever and I will be doing this again. Is this for free? WOW! Love the suggestion of a little pot of “no” leftovers! YUM!
My sister is pie picky and we chose this recipe to make for Thanksgiving as a dessert we both would enjoy. She’s never made a custard or pudding pie before and was so happy with how the pie and filling turned out. The instructions were simple and the custard came out delicious and smooth. We used all dark chocolate and it’s so fantastic. Not too sweet and really hits the spot. We’re splitting the leftover custard for a snack with some coffee it’s so good! This recipe is definitely a keeper for future family events
Quick question. My custard is pure liquid for some reason and I just poured into my pie tin to set and nothing is happening. I assume it’s too late to do anything but if anyone has any suggestions I would super appreciate it as I can’t afford to make another dessert. I love your book and all your recipes Nagi. Thanks much
My base was quite thick although I smushed down and again after the 10 minutes in the oven. Made it hard when I went to serve. I want to do it again for Thanksgiving as it was lovely but need to improve my base. Has anyone used less cookies or suggestions on a slightly thinner crust? Please and thank you 🙏🏽 x
Our son made this pie for our Saturday night dinner/movie night. It was fantastic. Best chocolate pie ever. He and his wife love your recipes, as do I. We are wearing your cookbook out. PS: Even down under you have great Mexican recipes. That says a lot from a Texan!
I made this for a get-together last week. BEST dessert we’ve ever had. It’s a good thing we had to share it. The crust held together nicely when cut. The parchment paper did stick a little bit but no problem since the whipped cream covered it. Thanks, Nagi, for this absolutely fabulous recipe.
Very timely given (sad) news about Sarah Lee. This looks delicious. Can’t wait to try it.
Do you think this would work in one of those fluted tart tins?
I wanted to, but decided it’d be really difficult to get out without the sides crumbing. I made it in a lamington tin in the end and didn’t take the crumb up the sides. The base held together well, and I was able to get it out in one piece. I topped with a 50/50 mascarpone/double cream mix because I wanted to use a fluted nozzle for presentation so needed a firm cream. Worked a treat and looked very pretty.
Chocolate cream pie. The perfect pie. Thank you for the recipe. I made one for our eye vet and staff. They of course loved the pie.
Another Nagi hit! Soooooo tasty. Supermarket Bavarian is one of my favourite freezer desserts….but this is next level! I have to say- I applaud the clean cut you’ve managed in your photos – we definitely didn’t have that experience 😂 Nonetheless – tastes the same. Was super easy to make too.
Omg this was sooo good. I made one for my son’s 13th birthday dinner and it was so delicious that he has given strict instructions I make another for the family party on the weekend, but requesting that it be just the same but double quantities (he just wants to eat it every day)!
Only issue is that my baking paper stuck firm to the custard and I had to massacre it off with a knife. Was fine as we covered it in whipped cream but not sure if anyone else had this issue? I followed the directions, put it straight on the custard once the custard was poured, bench for 2 hours, fridge overnight.
Delicious! Being irrepressibly greedy, we caved in and tried the pie (which I made in a slice tin) after 2 hours on the bench and only 4 in the fridge. Then we officially dived into it the next day (and the next and the next). The ‘fully set’ version is better without a doubt. We’re 5 days in now and it’s still perfect (we’re adding the cream as we go) so it’s a really great make-ahead recipe, too.
Has anyone frozen this?, If so how long for and was it ok once defrosted?
Looking up freezing egg custards it looks like you can freeze egg custards and defrost in fridge with paper or gladwrap on it to stop ice crystals forming but the custard may need whipped up. It seems to keep for 3mths in the freezer. You could do a trial with a small amount of chocolate custard (yes I know it’s a sacrifice…but it’s for the greater good). The other option is to make up the bases and freeze them and make the choc custard on the day of serving.
Would it be possible to use a springform cake tin for this?
Hi Nagi – Thanks for this delicious and easy recipe. I made this just yesterday for the first time for a BBQ at our home, welcoming some new residents to our country. I had the problem of my baking paper sticking to the custard, peeling it off it took about 1cm of that deliciousness with it. Would spraying paper lightly with oil stop this next time do you think? Thanks 😊
Hi Nagi & Dozer! 🙂
I made this DELICIOUS pie for Thanksgiving! It is THE BEST Chocolate Cream Pie in the UNIVERSE!!!
Thank-you so very much! xoxo
OMG! There’s only 2 of us, and ordinarily we’d have friends over when making dessert. Soo glad we didn’t this time 😁 It lasted a whole 2 days. Highly recommend for breakfast 😜
Can you freeze this?
Uf!!! Eso se ve delicioso. Gracias por compartirlo