What’s the best way to inject the distinctive choc-hazelnut flavour of Nutella into a Nutella Cheesecake? Make it NO-BAKE. It’s the secret to preserving the Nutella flavour. Of course, a triple punch of Nutella also helps here: in the mousse-y cream cheese filling, the ganache topping and a good melty drizzle of the stuff to finish it off!
Sounds indulgent? That would be because it is. 😈 This cake is not for faint hearts and weak arteries. It’s for serious Nutella lovers only!
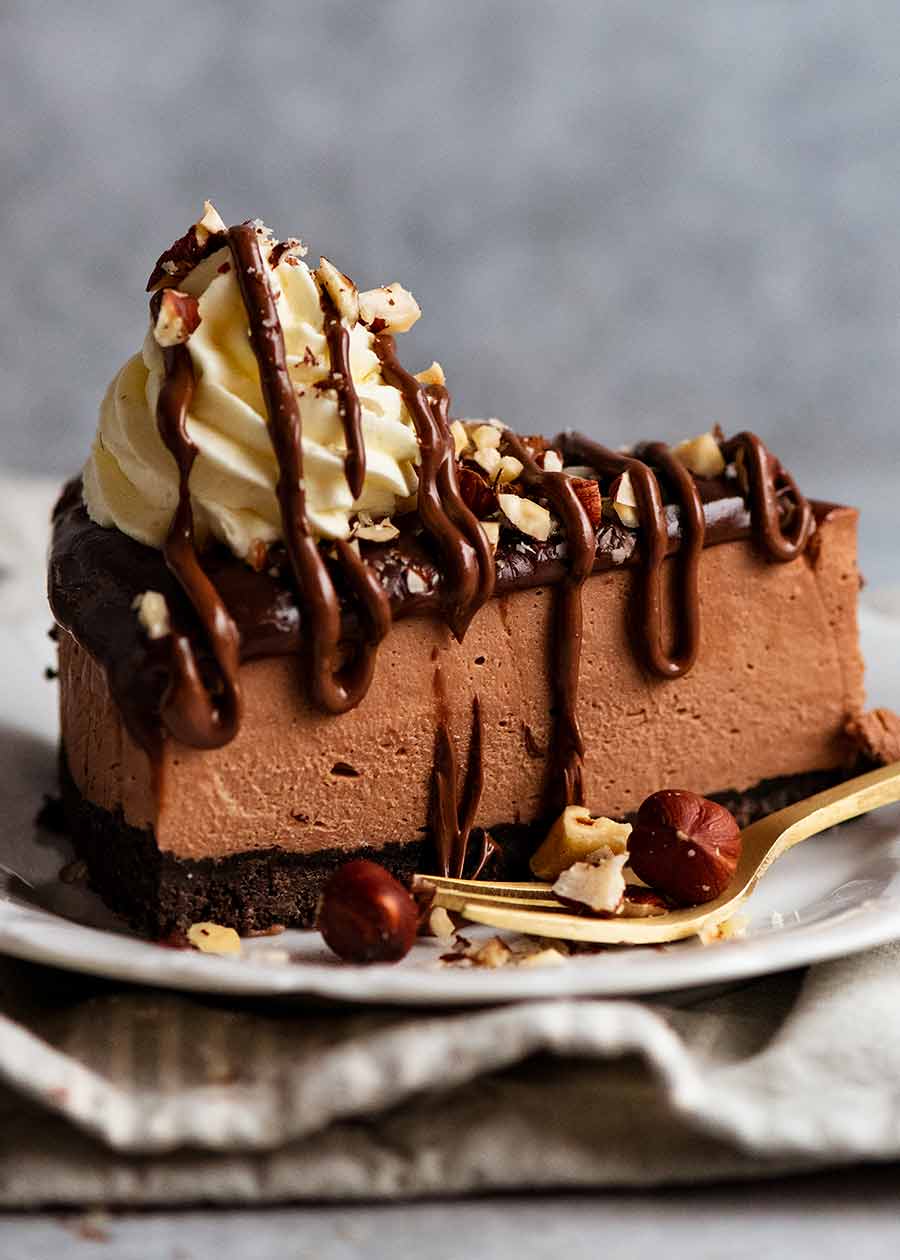
Nutella Cheesecake
I’m a little fussy about my cheesecakes. In the past I’ve publicly declared that baking is the one and only way to achieve a light-and-still-rich-but-not-overly-so cheesecake that ticks all the right boxes.
But there are times when baking is not the route to the best result. Say, Mango Cheesecake. Baking alters the flavour of mango and it’s just not the same.
And, it turns out, Nutella is the same. The baked version wasn’t bad. It’s just that the no-bake version was so much better, dialling up the Nutella flavour to the max!
Bonus: It’s a whip/pour/fridge job, and waiting at the end of this (short and easy!) path is THIS:
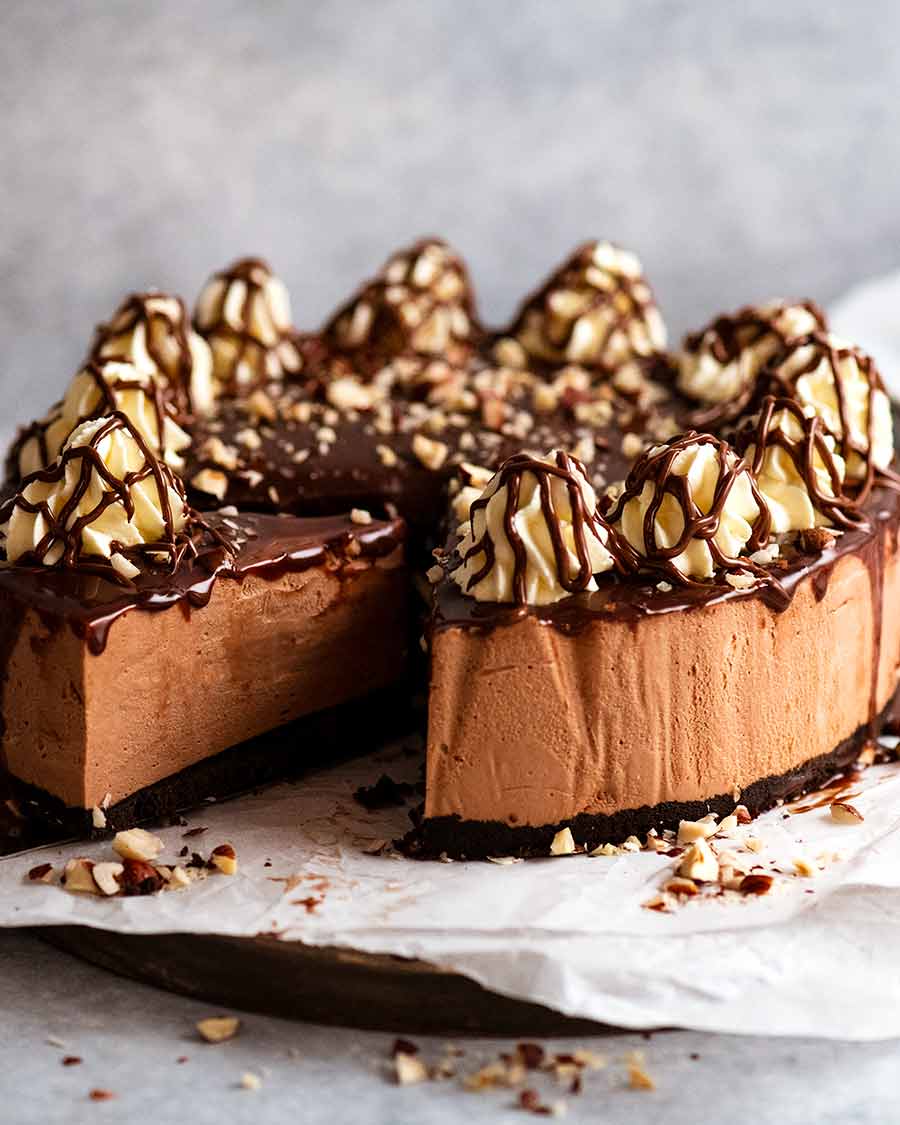
Holy moly, if that doesn’t make your knees weak and get your heart pumping, you must not have a pulse to begin with. 😂
Ingredients in Nutella Cheesecake
Here’s what you need to make Nutella Cheesecake. Shockingly but reassuringly few ingredients!
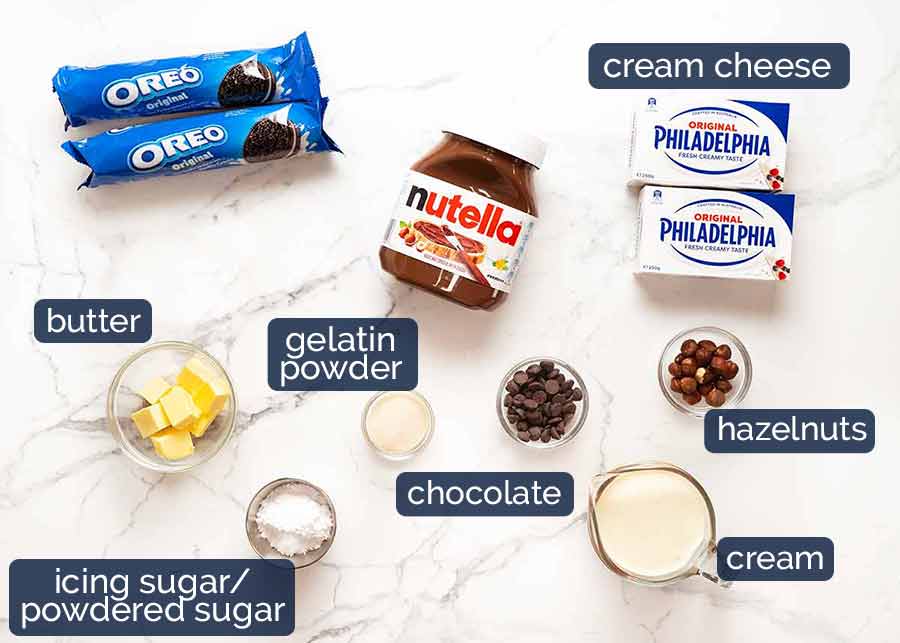
Nutella – An entire 500g/1lb jar ends up in this Cheesecake. It’s a Nutella cake, people. Happy days!
Cream cheese, block form – Philadelphia brand is my preferred, and they aren’t paying me to say that!! I’ve strayed from the brand before and regretted it.
It must be the brick type, as opposed to the cream cheese sold in tubs which is softer. The latter is formulated to be easily spreadable, which we don’t want. If you can only get the spreadable tub stuff, you’ll need to use a bit more gelatine to set it properly (see recipe notes – this note is particularly for UK readers, as I believe brick form cream cheese may still not available there);
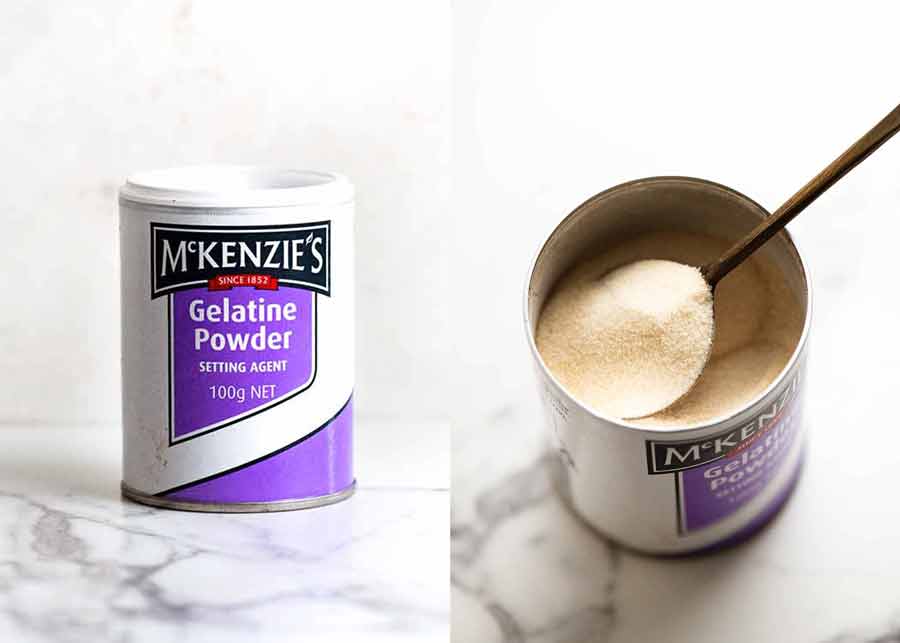
Gelatine powder – Gelatine is what sets the cheesecake in its fluffy mousse-like form. It’s widely available in the baking section of grocery stores. The setting strength is (to my knowledge) standardised globally, unlike gelatine sheets (don’t get me started on those!!)
The brand I use is McKenzie’s, the most common brand here in Australia:
Icing sugar / powdered sugar – Heads up, Australians: It’s best to use soft icing sugar not pure icing sugar, though for this recipe it’s ok if you only have pure. Soft icing sugar is used to make fluffy, creamy frostings like buttercream frosting. Pure icing sugar sets hard and is used for things like Royal Icing. Never confuse or interchange these two types for frostings. But for this Nutella Cheesecake, it is ok since we’re not using it for frosting;
Oreo biscuits – This is for the cheesecake crust. I like using Oreo cookies for the texture and flavour, I find they’re more chocolate-y than most other chocolate biscuits. But any plain chocolate biscuits / cookies will work fine here, such as Arnott’s Chocolate Ripples;
Cream – Cream is used in 3 ways in this recipe:
Filling: Whipped until fluffy then folded through the Nutella Cheesecake Filling. Cream is what makes the filling light and airy, while the gelatine makes it set;
Nutella ganache: Combined with melted Nutella and chocolate to make the ganache layer that covers the cheesecake; and
Whipped and piped: for decorating the cake!
Butter – Just regular unsalted butter, to help the biscuit base hold together; and
Hazelnuts – For sprinkling across the surface. We want the nuts for texture, visual effect and to double down on the hazelnut flavour in Nutella!
How to make Nutella Cheesecake
Part 1: Prepare the pan (with a TIP!)
Here’s a nifty tip for making cheesecakes: flip the base of a springform pan UPSIDE DOWN. This way, you don’t have the lip of the base to contend with when removing the finished cheesecake = no base-cracking stresses. Though actually, once set cheesecakes are much sturdier than you think!
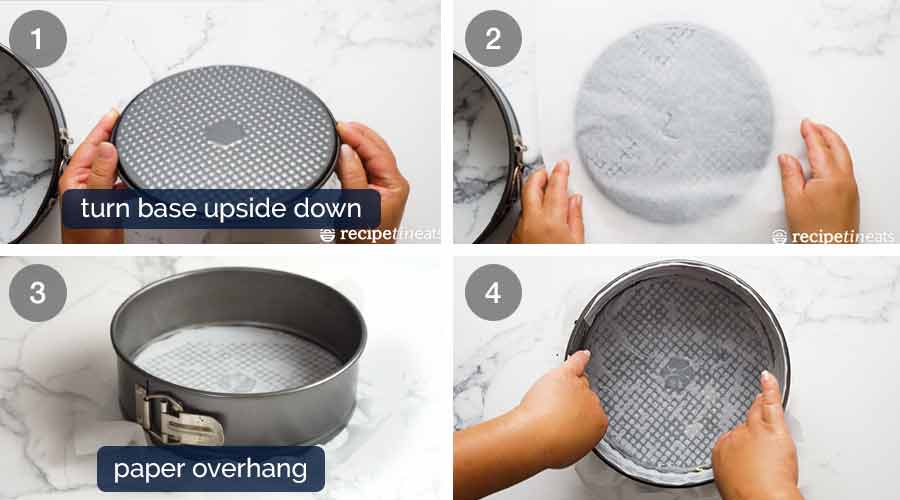
Flip the base upside down – Flip the base of a springform pan upside down;
Butter and line – Smear the base and sides with a bit of softened butter to help the paper stick. Then press a square piece of parchment/baking paper onto the base;
Clip sides with paper overhang – Don’t trim the paper off. You want the overhang sticking out the sides of the pan to make it easier to remove the cheesecake later. It can be a bit fiddly to get the upside base clipped in, but you’ll figure it out!
Line sides – Use strips of baking/parchment paper to line the sides of the springform pan.
Part 2: Oreo biscuit base
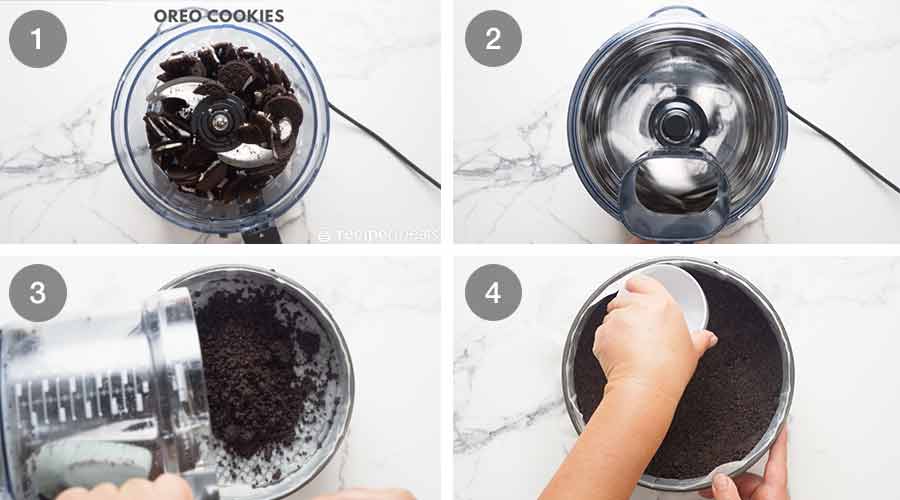
Break up cookies roughly by hand, then place in a food processor;
Blitz until it becomes sand-like. Pour in the melted butter and blitz again briefly to just combine;
Tip this cookie-sand into the lined pan; and
Press into pan – Use something with a flat base and straight sides to press the crumbs firmly against the base of the pan. I use a measuring cup!
Ordinarily, I also have biscuit sides for my cheesecakes for no other reason than I love biscuit bases! But for this Nutella Cheesecake, I think it’s nice to be able to see the different cake layers so I only use it for the base.
Part 3: Nutella Cheesecake filling
It’s a dead simple mix-and-pour job! OK, OK, so I’m understating it a bit … but it really is straightforward, I promise!
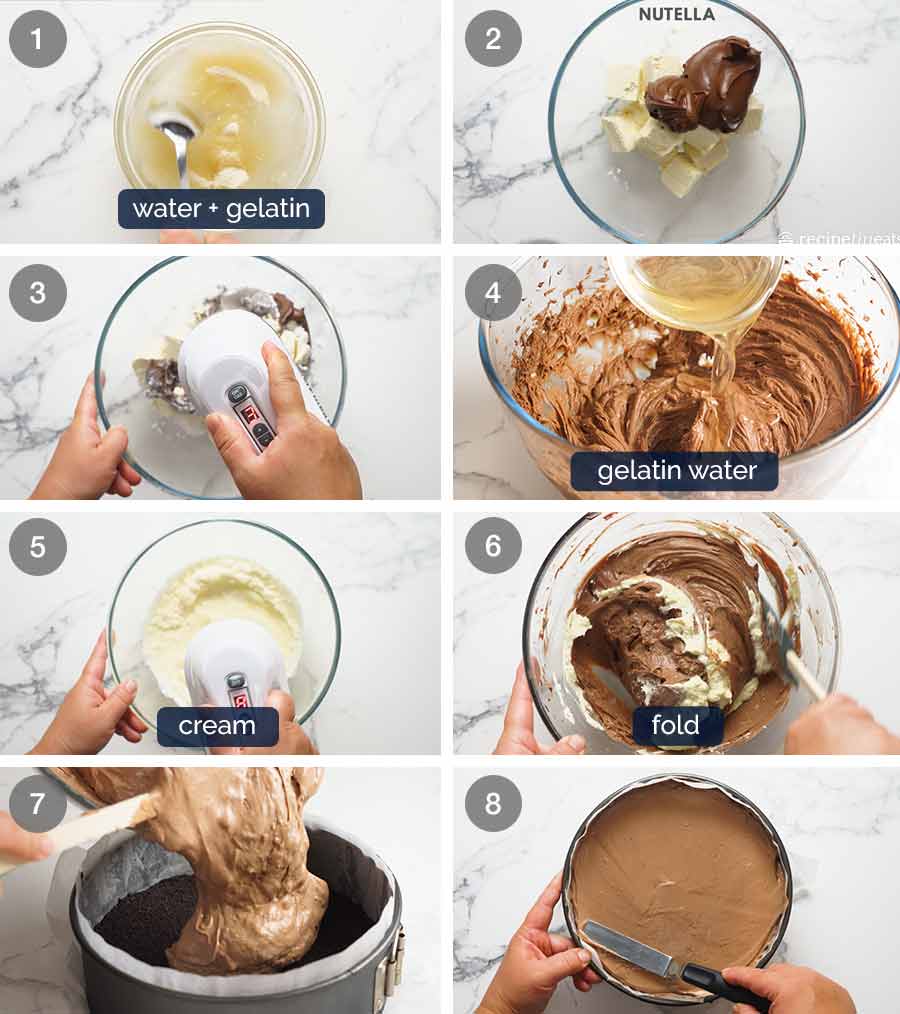
Bloom gelatine – This simply means mixing gelatine powder with a little water and leaving it so the gelatine granules absorb the water and swell, so that they properly dissolve. The gelatine liquid then sets like firm butter. For most recipes this is then mixed into a hot liquid (like hot chocolate mixture for a Chocolate Mirror Glaze, or hot cranberry juice to make jelly for Christmas Trifle) which makes it dissolve.
For this recipe, we’re doing things a little differently. We add a bit of hot water to the solidified gelatine mixture to return it to liquid form, before mixing into the Nutella Cheesecake filling later on;
Nutella filling – Next, we start the filling by beating cream cheese with the Nutella and icing sugar;
Beat the mixture and it’s smooth and fluffy. This takes around 1 1/2 minutes on Speed 7 using a handheld beater;
Add gelatine – Then pour in the gelatine mixture we prepared in Step 1 and mix well to incorporate;
Whip cream – Next, whip the cream in a separate bowl until stiff peaks form. We want it really fluffy because this is what aerates the Nutella Filling so it’s lusciously mousse-like;
Fold through – Then fold the cream through the Nutella mixture using a rubber spatula. Be gentle here, we don’t want to knock the air bubbles from the cream! The lighter your touch, the fluffier the filling of the cheesecake will be;
Pour filling into prepared biscuit base; and
Spread to level the surface. Refrigerate to set for 1 hour before topping with Nutella ganache. The filling will not be fully set, but it will be set enough to pour the topping over.
Part 4: Toppings
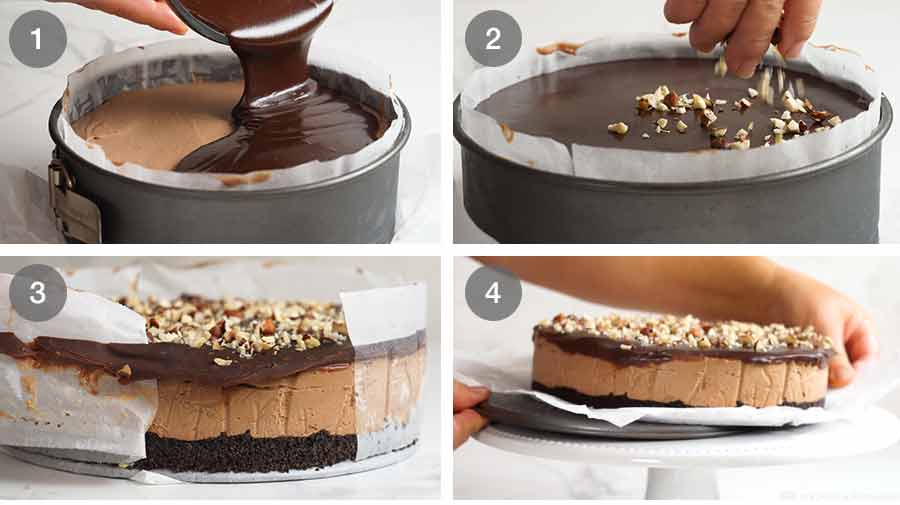
Nutella ganache – Heat cream, Nutella and chocolate chips in the microwave, and stir until molten and smooth. Let it cool slightly before pouring over the chilled cheesecake. Don’t sprinkle the hazelnuts on yet, wait until the the top is chilled and set, otherwise the hazelnuts will just sink!
Chill 3 hours to set – The cheesecake needs to chill for at least 3 hours to fully set all the way through. Once set we can sprinkle the hazelnuts onto the ganache layer.
Note: The ganache topping is softer than you might expect. It doesn’t set firmly and you cannot slice through it 100% neatly; it will smear slightly and droop on the edges a bit. This is intentional. Why? Well, firstly I think it should be molten-like so it resembles Nutella. It also tastes better this way. Thirdly, if the ganache is any firmer, it tends to slide off the Nutella filling like the way cheese slides off a badly made pizza. So I stand by the oozy Nutella Ganache – it looks, tastes and eats better!
Release the cake! Remove the cheesecake from the springform pan and carefully peel away the paper sides, noting what I mentioned above about the ganache being quite soft;
Remove from base – Remember that pain you went through to clip the base in upside down? (You did follow that step, right?) It’s about to pay dividends! Just grab the paper overhang now for grip and slide your cheesecake off the cake pan base. Because there’s no lip, it slides straight off onto your serving platter of choice;
Then, just simply pull the paper out from under the cheesecake.
If at any point the paper feels stuck to the pan when doing this, it’s just the butter used to grease the pan that has solidified. Run a knife under the cheesecake and it will release easily.
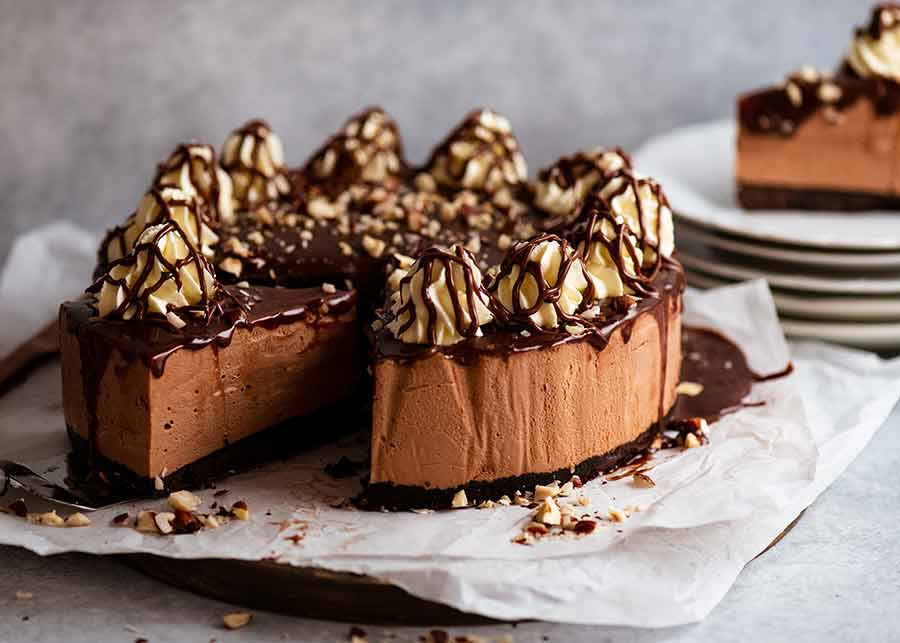
Decorating the Nutella Cheesecake
It’s a pretty cake just as it is, but we can bling it up further with a few finishing flourishes! First, whip up some cream and pipe blobs around the rim.
Then warm up a little bit of Nutella so it’s pourable and drizzle it across the cream. You can do this either using a small bowl and a teaspoon, or a little ziplock bag – just snip the corner.
No need to get too caught up in perfection on this step. A casual drizzle is the phrase I use! If you want to get technical, I did a drizzles in a criss-cross pattern across the cream. While you could do it across the Nutella Ganache too, you can’t really see it so there’s not a lot of point!
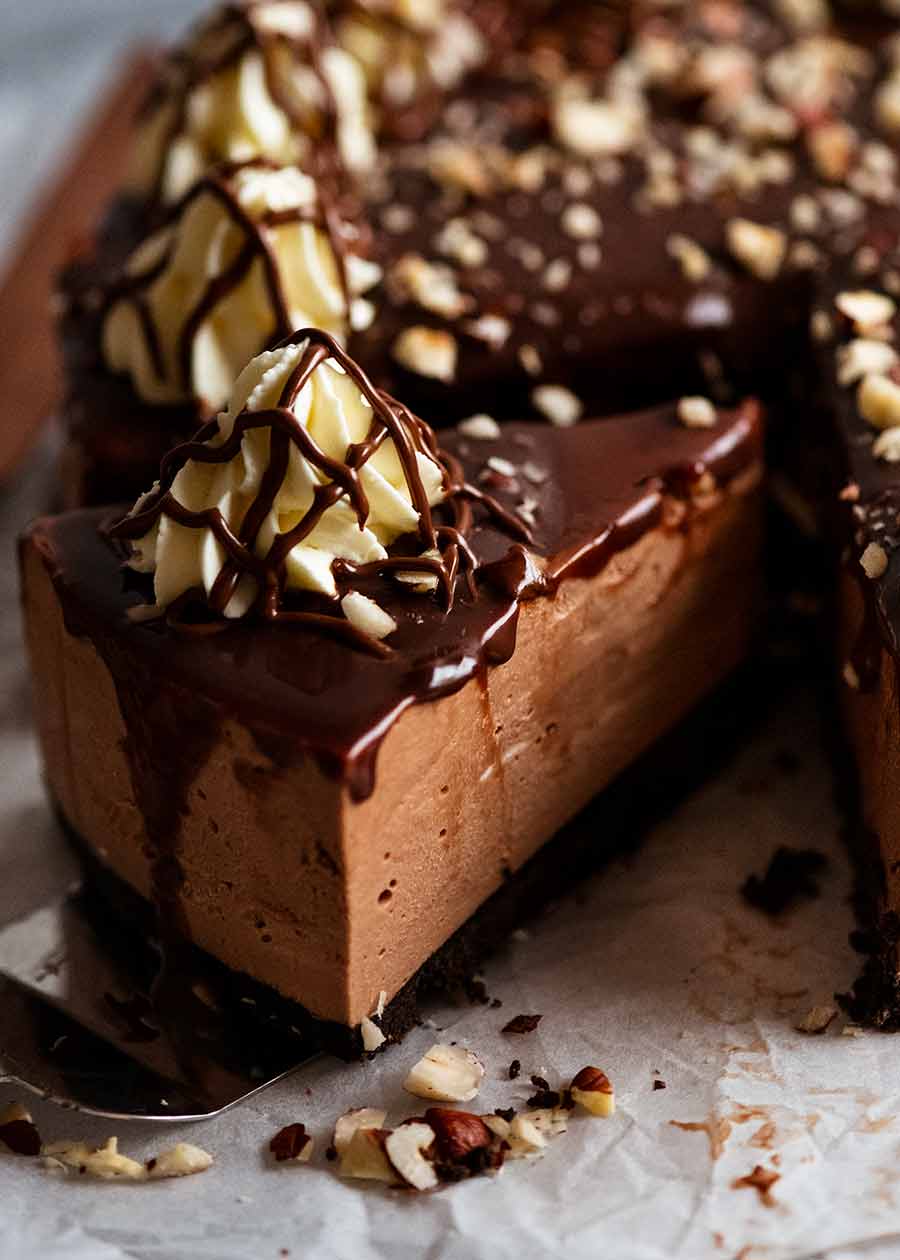
Ah, I almost forgot. You want proof of light and airy insides? Here you go … see all those little air pockets? Those pockets mean a luscious, rich and yet light mouthfeel. Really, it’s like a Chocolate Mousse!
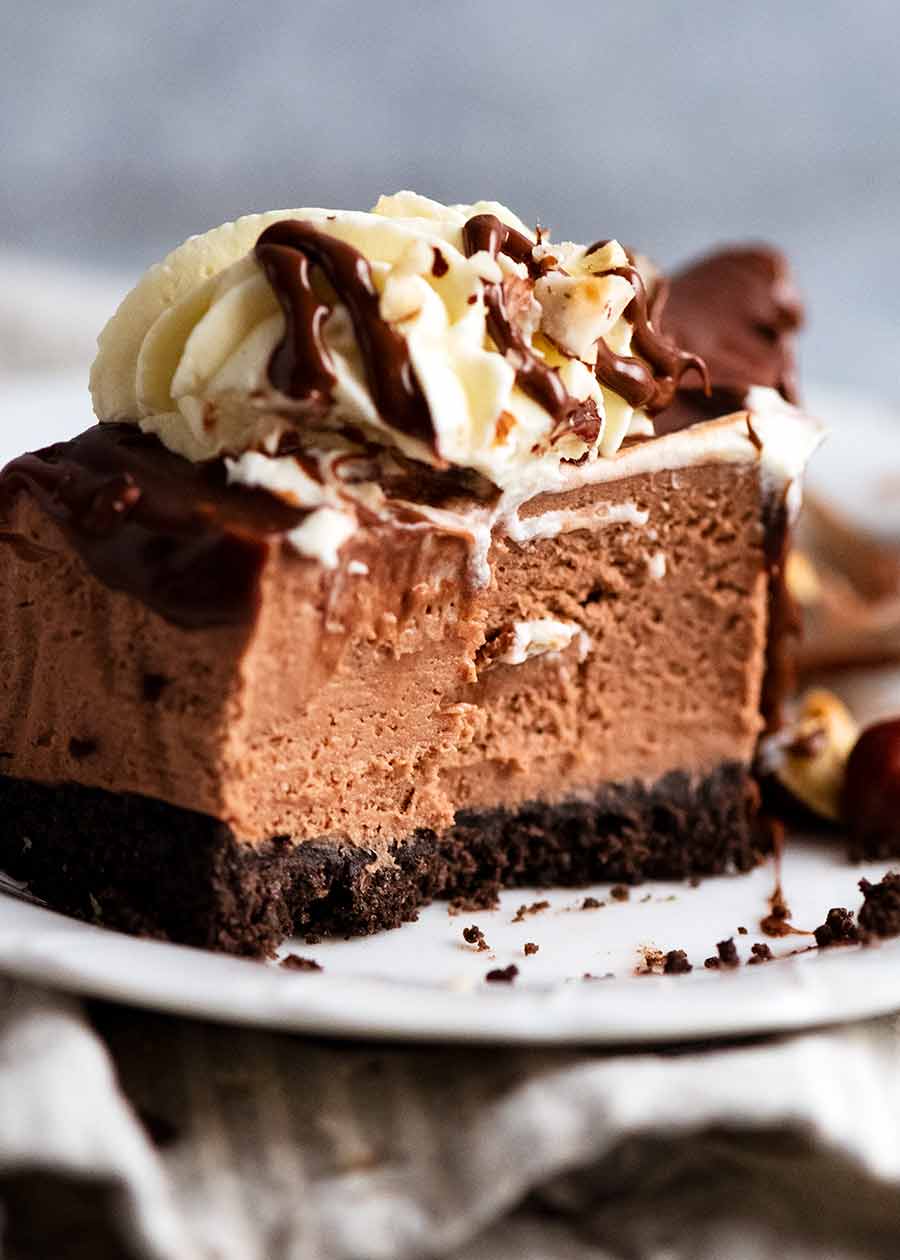
Because it’s no-bake, this Nutella Cheesecake needs to be kept in the fridge otherwise it will melt. It can be kept out in mild temperatures for quite a while, but on really warm days (say 28°C/82°F+) try to minimise the time it’s out of the fridge.
Also, unlike most cakes, where I go on and on about making sure you serve it at room temperature for the best eating experience, this Nutella Cheese is supposed to be served chilled. Believe me when I tell you I don’t say that very often, so enjoy the convenience of direct-from-fridge-to-mouth consumption! – Nagi x
Watch how to make it
Hungry for more? Subscribe to my newsletter and follow along on Facebook, Pinterest and Instagram for all of the latest updates.
Nutella Cheesecake (No Bake)
Ingredients
Base:
- 200g/ 7oz Oreo cookies (1.5 standard packs, Note 1)
- 60g / 4 tbsp unsalted butter , melted
Nutella mousse filling:
- 3 tsp gelatine powder (Note 2)
- 1/4 cup water
- 500g / 1 lb cream cheese , softened (block form, Note 3)
- 1/2 cup soft icing sugar / powdered sugar (Note 4)
- 1 cup Nutella (Note 5)
- 1 cup heavy/thickened cream
Nutella ganache topping:
- 1/2 cup heavy/thickened cream
- 1/2 cup Nutella
- 1/4 cup dark chocolate chips/semi-sweet chocolate chips
Toppings:
- 1/4 cup hazelnuts , lightly toasted then chopped (Note 6)
- 1/2 cup heavy/thickened cream (for whipping)
- 3 tbsp Nutella , warmed
Instructions
- Prepare pan: Flip the base of a 20cm / 8" springform pan upside down – this makes it easier to remove the finished cheesecake without the lip in the way. Butter pan base, then press on a square sheet of baking paper. Clip the pan sides onto the base, letting the excess paper overhang. Butter and line the pan sides with more baking paper.
Oreo biscuit base:
- Blitz cookies: Roughly break up Oreos with hands and place in food processor. Blitz until they become fine crumbs. Add melted butter, then blitz again until combined.
- Press into pan: Transfer crumbs into prepared pan, pressing evenly and firmly on to the base (I use the underside of a straight-sided, flat-bottomed cup measure to do this).
Nutella mousse filling:
- Bloom gelatine: Place water in a small bowl then sprinkle the gelatine powder across the surface. Stir to partly dissolve. Set aside 5 minutes. It will turn thick; this process is called blooming. Microwave the gelatine for 15 seconds to turn it into liquid, stir, then let it stand for 5 minutes to cool.
- Cream cheese and Nutella mixture: Beat cream cheese, Nutella and icing sugar until smooth. Add the cooled gelatine liquid and beat another 30 seconds.
- Whip cream: In a separate bowl, whip the cream until stiff peaks form.
- Fold in cream: Add one third of the whipped cream to the Nutella mixture and gently fold until just combined. Fold in another third of the cream the same way. Then fold in the remaining cream.
- Transfer to cake pan: Pour the mixture into the prepared tin and place back in the fridge for at least 1 hour to set.
Decorating
- Nutella ganache: Place cream, Nutella and chocolate chips into a heatproof bowl. Microwave in two 30-second bursts, stirring in between, until smooth.
- Pour ganache onto cheesecake: Allow ganache to cool for 5 minutes, then pour over the set cheesecake base. Tilt pan to spread it over the surface evenly.
- Refrigerate cheesecake at least 3 hours before sprinkling with hazelnuts (otherwise they sink into the cake!)
- Decorate: Sprinkle over hazelnuts. Pipe dollops of whipped cream around the edge, then drizzle with warm Nutella. Slice greedy-sized wedges and devour!
Recipe Notes:
Nutrition Information:
More showstopping cheesecakes!
Life of Dozer
Particularly interested in assisting with the development of this particular recipe…..


I made this yesterday as a test run before Christmas Day. It wasn’t hard to make as I thought it would be. Turned out perfectly. My partner and I loved it! Can’t wait to serve it to guests on Christmas Day,
How long do you think it will keep in the fridge? Thinking of making ahead of time.
Hands down the best Nutella cheesecake recipe I’ve ever made. The ingredient combination is perfect and the gelatine added is just want we need in our hot Queensland summers.
The easiest and most beautiful cake I’ve ever made, everyone loved it!
Fantastic recipe! Easy to make and absolutely delicious. If you’re a Nutella fan you’ll love this no-bake cheesecake. ❤️
Hi Nagi,
Oh boy! I failed miserably with this one, it was my first time using gelatine and I messed up. I did not realise how quickly that stuff sets (I’m awfully slow when following recipes too). So, the gelatine had set completely solid before I dumped it into the mixture, I was beating and beating and beating but the gelatine would not break up and mix in. I cried! I was making this for my fiancés birthday and thought I’d have to throw it out and start again, thankfully, I contacted my Mum (Mum normally does the birthday cakes but wasn’t feeling well this time) who advised to use a sieve to separate the chunks of gelatine and salvage the mixture. It worked! I cried again! I managed to finish the recipe and get it into the fridge without any further trouble. The texture was more like a mousse but it wasn’t a sloppy mess like I had expected it would be having been unable to make the gelatine work. Despite my gelatine error… I am please to say the result was delicious, my fiancé and I loved it! My parents were extremely impressed which was lovely. I’ve been quite the basic cook, I didn’t think I’d be able to pull off more complicated recipes. Nagi, your blog and recipes have truthfully given me the confidence to learn more and step outside my comfort zone, I don’t even look at the jar or sachet meal bases at the shops anymore! Fresh ingredients and cooking from scratch is definitely the way to go and I’m never looking back!!!
Loved the no bake part of this. Easy to follow recipe and this was a hit with everyone.
Love this recipe, thank you. How long will it keep in the fridge?
The mouse is also brilliant sandwiched between 3 or 4 half inch layers of cake sprinkled with hazelnut liqueur, surrounded by a “pallisade” of chocolate fingers tied with ribbon – poshest gateau!
I made this for my son’s 17th birthday. The texture was amazing, so silky in the mouth. Everyone loved it.
Gluten-free heaven! I just swapped out the Oreos for the new GF ones, and it worked perfectly! Thank you!!
Just wondering when if this can be made two days in advance?
Yes Janelle you can make his two days ahead! N x
The recipe is fantastic. So easy to make and utterly delicious without being cloying sweet. I actually made 1.5 times the filling in a 20cm tin so I would get the extra height. Will definitely make again.
Woo hoo!! I am so glad you enjoyed it Rosie!! N x
Hello Nagi,
What size is the pan ?
As per Step 1 of the recipe Sevgi: Prepare pan: Flip the base of a 20cm / 8″ springform pan upside down. N x
Hi Nagi. Is there any substitute for gelatin in this recipe? Hiw about agar agar or cornstarch? If so how to use?
Looking forward to making this for Christmas. When storing in the fridge on a plate the day before can it have gladwrap over it or will it stick? Thanks!
Hi Janine – I would store it in an airtight container with a lid that doesn’t touch the top or you can place a few toothpicks in the top and stretch the plastic wrap over that so it doesn’t touch the cake’s surface. N x
Hi Nagi,
Can you please advise if I can use vege gel alternative to standard gelatin as I am vegetarian- will this work ok in this recipe please?
Also as I live in Uk , I will have to use extra Philadelphia owing to the fact that you are correct in your assumption that in UK we only have tubs of Philadelphia not the blocks unfortunately.
Looking forward to making this.
Thank you Jane.
Made this for my team today. Brought a bit of joy to the office and my kids loved the leftovers. Pro tip though, the cake will melt a bit if you transport it on the front seat in the sun while stuck in peak hour traffic 😂
Good to know Lucia!! Will keep the air con on high! N x
Hello,
Can I make ahead and freeze this cheesecake?
HI Bewwie – I don’t recommend freezing cheesecakes with gelatin in them as it will change the texture. N x
Fabulously scrumptious!!!
One suggestion: Nutella is so messy to handle, it would be helpful if the recipe gave weights as well as cup measures, then we could add it straight to the bowl sitting on a scale!
Hi Ephraim – most of my recipes have a toggle button at the top to swap between metric and cups. N x